Tuesday, June 29, 2010

Mocha Chocolate Chip Muffins

This morning I was craving coffee and something chocolaty. A quick search on Tastespotting and I found these Mocha Muffins with Chocolate Chips posted at The Food Librarian. Bingo!

These were quick to throw together and helped satisfy my longing to bake. I thought these muffins were pretty good, not great, but good. I followed the original recipe from Bon Appetit, omitting the pecans because I didn't have any in the house, and found the flavor a bit lacking. Overall there was obviously a hint of something other than chocolate, but the coffee flavor wasn't pronounced enough for me to really consider these mocha muffins. The chocolate chips in the muffins were, however, plenty to satisfy my chocolate craving. I used a mix of bittersweet and semisweet chocolate chips and really loved the slightly bitter dark chocolate flavor.

Overall I'd say I enjoyed these muffins, but I definitely wouldn't make them again without upping the espresso powder, increasing the cocoa powder, or adding in the pecans or something else to give a bit more depth of flavor.

Mocha Chocolate Chip Muffins
from Bon Appetit via The Food Librarian

1/4 cup hot water
1 tablespoon instant espresso powder
1/2 cup buttermilk
1/2 cup vegetable oil
2 large eggs
1 teaspoon vanilla extract
1 3/4 cups all purpose flour
1/2 cup sugar
1/2 cup packed golden brown sugar
3 tablespoons unsweetened cocoa powder
1 teaspoon baking powder
1 teaspoon baking soda
1 teaspoon salt
1 1/2 cups milk chocolate chips (I used 1 cup bittersweet and 1/2 cup semisweet chocolate chips)
1 cup coarsely chopped pecans (about 4 ounces), toasted (I left these out)
Preheat oven to 375°F. Line twelve 1/2-cup muffin cups with paper liners. Stir 1/4 cup hot water and espresso powder in medium bowl until espresso powder dissolves. Add buttermilk, oil, eggs and vanilla and whisk until well blended. Mix flour, sugar, brown sugar, cocoa, baking powder, baking soda and salt in large bowl. Add buttermilk mixture and stir just until combined. Mix in chocolate chips and pecans.
Divide batter equally among prepared muffin cups. Bake until tester inserted into center of muffins comes out clean, about 25 minutes (Mine were done after 20 minutes). Transfer muffins to rack and cool.

Friday, June 25, 2010

Raspberry Lemon Cupcakes

The fresh raspberry and lemon flavor of these cupcakes was absolutely to die for! I made these for the hubby to take to a potluck at work yesterday and I thought they were divine. The lemon cupcake was perfectly light in texture with just a hint of refreshing lemon flavor. The raspberry buttercream was sweet and delicious with the most beautiful natural pale pink color.

The cupcakes baked up to a beautiful pale golden dome--I finally a homemade cake recipe that bakes up beautifully! Oddly though, I noticed near the end of their baking time, the cupcakes sort of shrank up a bit. They shortened in height and pulled away from the cupcake liners. I've never had this happen before and I'm not sure why it did. I've never made a true white cake recipe before, so I wondered if that had something to do with the shrinkage. Despite shrinking up a bit, they still looked lovely and I plan to try making these again as soon as possible because they were absolutely delicious!

The recipe comes from My Baking Addiction who adapted the cupcake from Dorie Greenspan's Perfect Party Cake (and now I'm dying to get my hands on her book Baking: From My Home to Yours). My Baking Addiction also uses the cupcake base and pairs it with a lemon cream cheese frosting in her Lemon Cupcakes, which sounds like a heavenly combination since the hubby and I are both crazy about cream cheese frostings. I'm thinking about making halving the recipe and making some mini Lemon Cupcakes this weekend.

These cupcakes have such a refreshing quality, making them perfect for summer! The cake is so light and tender in texture. I think these would be the perfect dessert for casual summer entertaining.

Raspberry Lemon Cupcakes recipe from My Baking Addiction.

Tuesday, June 22, 2010

Oreo Chocolate Chip Cookies

I realize I sure have been posting a lot of Oreo/cookies & cream recipes lately. Ever since I made those delicious Cookies & Cream Cupcakes I've been baking with Oreo cookies nonstop. Can you really blame me?

I made these Oreo Chocolate Chip Cookies to take to a close friend who is, unfortunately, in the hospital undergoing chemotherapy for leukemia. I got together yesterday evening with some friends and we picked out a card and some "trashy magazines" to take to her to help pass the time. Our friend is so vibrant and social and I can't even imagine how difficult this time in the hospital is going to be for her. We plan to continually spoil her with visits, baked goods and lots of magazines to read and movies to watch. I hope, in some small way, all the little gestures help her get through this time.

Oreo Chocolate Chip Cookies
makes ~2 dozen
adapted from Picky Palate via Lovin' From the Oven

1 stick unsalted butter, cold and cubed
6 tablespoons granulated sugar
6 tablespoons light brown sugar
1 egg
1 teaspoon vanilla extract
1 ¼ cup flour
½ teaspoon baking soda
½ teaspoon salt
8 Oreo cookies, chopped
1 cup bittersweet chocolate chips

Preheat oven to 350 degrees F. Cream butter and sugars until well combined. Add egg and vanilla extract, mixing until combined.

Place flour, baking soda and salt in a medium bowl; whisk to combine. Slowly add the dry ingredients to the wet, then stir in the chopped Oreo cookies and chocolate chips until just combined.

With a 1 1/2 tablespoon cookie scoop, portion the cookies and space them at least 2 inches apart on a parchment lined baking sheet. Bake for 7-9 minutes or until cooked, but still soft in the centers. Let cool on the baking sheet for 3 minutes before transferring them to a cooling rack to cool completely.

Monday, June 21, 2010

Creamy Oreo Pie

First off, this is another ugly photo post. Honestly, I have two windows in my apartment that I've really learned to work with and how to get a great photo during certain times of the day. Any other place or time and I simply can't capture a pretty photo if my life depended on it. I am going to work on this. I just need to find time to really play around with white balance on my camera in different settings to figure out how to get natural and captivating colors outside my ideal shooting situation. I didn't have my trusty tripod with me for these photos and that definitely made my job even more difficult.

Terribly photos aside, this Oreo Pie, though nothing too exciting visually, is simple but delicious. I had about 2 hours this afternoon to make something for dessert for Father's Day/the weekly life group cookout my in-laws have every Sunday evening. I knew I had to make something that was quick and I wanted something that would be cool since it's been so hot out lately. This pie, while definitely rich and decadent, does have a slightly refreshing quality about it. This one is a real breeze to throw together. It's even faster and more fool proof to make if you decide to buy a ready made Oreo pie crust. I decided to make my own to use up the rest of the package of Oreos I needed for the filling and because I wanted to use my pretty, vintage inspired pie plate. I roughly made 1 1/2 the original recipe to fill my large pie plate. The amount was perfect for my 10-inch x 2-inch pie dish. This is a really simple recipe and is perfect for all those cookies & cream fans out there. I definitely suggest making this sometime!

Creamy Oreo Pie
adapted slightly from Nabisco

39 Oreo cookies, divided
1/4 cup (1/2 stick) unsalted butter, melted
1 (8 oz.) package Philadephia cream cheese, room temperature
1/3 cup sugar
2 cups thawed Cool Whip

Process 26 cookies in a food process until finely ground; mix with melted butter until well blended. Press the crumb mixture into the bottom and up the sides of a 9-inch pie plate. Refrigerate the crust while preparing the filling.

Chop 9 of the remaining cookies; set aside. Beat cream cheese and sugar in a large bowl until light and fluffy. Gently fold in the whipped topping and the chopped Oreo cookies until well blended. Spoon into prepared crust and smooth top.

Refrigerate at least 2 hours or until firm. Pipe swirls of whipped topping on top of the pie and garnish with halved Oreo cookies before serving, if desired.

Monday, June 14, 2010

An Elegant Retreat

I stumbled upon this bedroom today and immediately fell in love! I've seen several bedrooms in the past that utilized crisp, clean whites and neutrals and have always enjoyed the sophisticated look and calming effect. This is by far the most lovely example I've seen and I would love to use this as inspiration for the day the hubby and I can invest in furniture and really decorate our bedroom. There is an elegance and grace about this room that really captivates me. It certainly has a feminine touch without being overwhelmingly girly. I think I could get my hubby on board for a knock-off version of this room for our future.

I am drawn to this neutral look the most when various textures are thrown in to create visual interest and drama. I've seen some gorgeous white and ivory bedding lately with pretty pin-tuck and rosette details that would be perfect for this application. I love the soft beige walls, crisp white trim, and dark wood accents in the furniture. These neutral palettes are perfect for adding pops of color which can be changed around daily, weekly, with the seasons, or just whenever the mood strikes. You could even work in a soft accent color more permanently with something like this gorgeous robin's egg tweed bench.

I do love color, but I find I have difficulty finding color schemes I could really commit to. While some folks can afford to change out furniture or mix things up every few years, I just don't see that kind of luxury in my immediate future. With a neutral backdrop such as this, you could easily switch out relatively inexpensive accessories such as pillows and art to completely change the way the entire room looks. A room full of crisp, clean colors will always look elegant, sophisticated and luxurious.

Bridal Shower Treats

First of all, let me say that these photos are going to showcase my complete inability to take a decent picture in anything but natural light. While I am fairly proud of my ability to take a pretty picture when the sun is shining, I still haven't quite gotten the hang of capturing colors accurately in harsh artificial light. I need to work on that.

That said, today I'm sharing photos of some treats I made last Friday for a friend's bridal shower. Her colors are black, white and clover, which I wanted to incorporate in the desserts. I chose to mostly use white with hints of black and with a few spots of clover to keep things elegant and simple. I thought the prettiest treats I made for the shower were these wedding cake shaped sugar cookies.

I decorated the cookies with royal icing. I outlined and flooded the cookies and let them dry for about an hour. After they were fairly dry to the touch, I piped on increasingly thicker lines (from top to bottom) and sprinkled them with crystal clear sanding sugar, giving the cookies a gorgeous, glittery sparkle. I then added three small handmade gum paste flowers for a sweet pop of color. This was really only my second time working with royal icing, so I'm pretty happy with how these turned out. I'd like to get some cute cookie cutters to practice decorating different cookies. I'm seriously smitten with these strawberry cookies from Bridget of Bake at 350 and would love to give them a try. If only I had an appropriate cutter.

I took the next several photos after setting up at the shower. I had to make due with borrowing some cake stands and a cupcake tier from my mother-in-law because I really have absolutely no serving pieces. I made chocolate and vanilla cupcakes, topping half of each with vanilla buttercream and half with chocolate fudge frosting. Each cupcake was topped with a gum paste flower.

With my limited resources, I couldn't get too creative with the presentation of the sugar cookies. I just piled them high on a large cake stand and called it a day. :)

I loved these black and white brocade look baking cups I found for the mini cookies & cream cheesecakes I made. I bought these from Bake it Pretty with most of the other supplies for the shower. I was pretty bummed about these. They worked great and were beautiful, but I paid almost $5 for them and then saw them at my local Kroger (can you believe these gorgeous baking cups are from the folks at Reynolds?) while I was shopping for ingredients for less than $3. I definitely made a mental note for the future!

I'm a bit embarrassed about the piping on my cupcakes. I was definitely behind schedule with everything and had to finish baking my cupcakes, make the frosting, and do all the decorating the morning of the shower. I was rushed, exhausted, and wasn't feeling well and it definitely shows. I was also half afraid I would run out of frosting and didn't have time to make more, so I was a bit less generous than usual with my frosting clouds.

You can't tell in these photos at all, but I painted the white gum paste blossoms with luster dust so they had a really pretty, pearly shimmer to them! I thought they looked very girly and elegant and contrasted nicely with the dark chocolate fudge frosting.

I wish I could have captured the beauty of the sanding sugar on these cookies better in the photos. It was such a pretty touch and now I want to coat everything in sanding sugar.

These cookies and cream cheesecake are really nothing to look at, but they sure were yummy! The pretty baking cups definitely help them look less drab. I thought about doing a cute little piped dollop of whipped cream on top of these, but I knew it wouldn't hold up well over the course of the shower.

Now you know how I spent Thursday evening, all of Friday, and Saturday morning. I really enjoyed making all these treats for the shower. I'm really excited about really experimenting with more recipes and figuring out my favorites in a few months once things cool off. With the heat we've had lately and the fact that I don't have air conditioning in my apartment, I'm not as inclined to want to get in the kitchen and bake. But once things cool off again, I fully plan to take advantage of the fact that I know can send my baked goods to work with the hubby so I can experiment with recipes without trying to figure out what to do will all the resulting desserts.

Most of the time when I bake for a given event, I really struggle over deciding what to make. With a few exceptions, I really don't have go-to recipes for the basics just yet. I still haven't found homemade plain chocolate or vanilla cupcakes that I completely love. There are some chocolate cupcakes that I have made that bake up beautifully and are pretty yummy but could be a bit more moist. As for vanilla cupcakes, I've yet to try a recipe that baked up to a nice, pretty dome. I half wonder if some of my issues with the appearance of cupcakes is due to my oven. I have a really cheap gas oven. While I have an oven thermometer and pay attention to it, I still find that I have serious difficulties getting my baked goods to bake up according to a recipe. A lot of times the texture turns out off or I'll have to bake things A LOT longer than a recipe states. I'm curious to see if and how my baking changes when I have a different oven. I've only been seriously baking since we moved into this apartment a little over a year and a half ago.

I'm curious, does anyone have any recipes for chocolate or vanilla cupcakes that they swear by? I know appearance isn't everything, but one of my biggest criteria for the perfect cupcake is that it bakes up with a beautiful, domed top.

Saturday, June 12, 2010

AllRecipes.com Favorite Photo - Again!

My Cookies & Cream Cupcakes were voted Favorite Photo today on AllRecipes.com! This is the third or fourth time one of my photos has shown up on the front page of AllRecipes and each and every time is a joy. It's such a neat feeling having one of your photos on the front page of such a popular site.

Wednesday, June 9, 2010

Cookies & Cream Cupcakes

I made these Cookies & Cream Cupcakes last night for the hubby to take to work with him today (to all three of his work places, actually). I wanted to try out the recipe since I was planning to use it for a bridal shower I'm baking for this weekend. I was looking for a super moist, rich chocolate cupcake that still baked up beautifully (as I've mentioned before, most moist chocolate cakes just don't deliver for me when I use them for cupcakes). I wanted something moist that wouldn't dry out overnight since I'll be baking the cupcakes for the shower the evening before to save my sanity of trying to bake and decorate 48 cupcakes the morning of a shower that starts at noon. This recipe promised to be moist and super chocolaty, so I had to give it a try!

These cupcakes were sinfully rich and moist freshly baked last night. Today they were still moist and delicious. Success! While the chocolate chocolate chip cupcakes are stellar, I must say my favorite part of these cupcakes is the cookies and cream buttercream. I'm surprised how delicious the buttercream is. I was a little concerned before I made it because it called for shortening (in addition to butter) and a full 2lb. bag of powdered sugar. I usually am more drawn to less sweet/tangy cream cheese frostings. Surprisingly though, the buttercream turned out delicious and not overly sweet. The frosting really tasted just like the center of an Oreo and these cupcakes definitely lived up to their name. When I make these for the shower this weekend, I plan to leave out the miniature chocolate chips (for a smoother surface) in the cupcakes and the crushed Oreos in the frosting. I'll be making 24 chocolate cupcakes and 24 vanilla cupcakes (in addition to Cookies & Cream Cheesecakes and Wedding Cake Sugar cookies). I'm thinking about doing half chocolate fudge frosting and half vanilla buttercream on the cupcakes. In other words, I'll be posting lots of baked goods after this weekend.

Unfortunately I've still got to decide on a vanilla cupcake recipe for the shower. I am thinking I may go with Magnolia Bakery's vanilla cupcakes.

Cookies & Cream Cupcakes

via My Baking Addiction

Chocolate Chocolate Chip Cupcakes
yields ~30 cupcakes

1 (15.25 oz.) package Devil's Food cake mix
1 (5.9 oz.) package instant chocolate pudding mix
1 cup sour cream
1 cup vegetable oil
4 large eggs
1/2 cup warm water
2 cups miniature semisweet chocolate chips

Preheat oven to 350 degrees. Line cupcake pans with paper baking cups.

In a large bowl, sift together the cake and pudding mixes. Mix in sour cream, oil, beaten eggs, and water until just combined. Stir in the chocolate chips and pour batter into prepared cupcake pans. (I filled each cupcake with 3 tablespoons of batter.)

Bake for 20-24 minutes, until tops spring back when touched and a toothpick inserted comes out clean. Cook in pans for 5 minutes before removing to a cooking rack to cool completely.

Cookies and Cream Buttercream Frosting

2 sticks of unsalted butter, at room temperature
1 cup shortening, at room temperature
1/8 teaspoon salt
1 tablespoon pure vanilla extract
2 lbs. powdered sugar
4-6 tablespoons very cold milk
8 crushed Oreo cookies (cream filling removed before crushing)

Cream the butter and shortening in the bowl of a stand mixer. Add the salt and vanilla extract; combine well. Begin sifting in the powdered sugar in three or four parts, mixing thoroughly after each addition. After all the sugar has been added and mixed in, begin adding the milk slowly, one tablespoon at a time, until desired consistency is achieved (you may not use all of the milk). Fold in the crushed Oreo cookies. Frost cooled cupcakes as desired and top each with a mini Oreo (optional).

*I had just enough frosting for the 30 cupcakes.

I used an Ateco 809 round tip to frost these cupcakes.

Tuesday, June 8, 2010

The Kitchenist

I stumbled across the Kitchenist this morning and perused Ele's entire blog over my morning coffee. With her beautifully arranged photos of fresh farmer's market produce and her hearty and healthy recipe posts, Ele has me romanticizing vegetables to a degree I never knew possible. Heck, I even found myself enjoying a bowl of chickpeas for breakfast because I was craving veggies something awful and I always have a few cans on hand even when the rest of my fridge and pantry are bare (more often than not I'm afraid). I've bookmarked several of her recipes to try, including a delicious looking Leek and Potato Soup. The Kitchenist is a real gem.

Monday, June 7, 2010

Shop Update

I've been adding some new pieces to my shop this afternoon. This first necklace is a similar style to the very popular Oui, Darling Necklace. I call it the Non, My Love Necklace. ;)

These earrings are one of my favorite pieces at the moment! They are styled after the incredibly popular and currently sold out The Prancing Peacock Earrings. While The Prancing Peacock Earrings were a bit whimsical and quirky, these Date Night Earrings are much more romantic and feminine. I only have one pair available at the moment but I plan to have more available soon.

The A Rose for My Love Necklace is currently available with your choice of three different colors. Choose from a red, pink or blue rose cabochon.

Lastly, the Hopeless Romantic Necklace, one of my best selling designs, is back in the shop.

Weather permitting, I'm hoping to photograph and add more items tomorrow!

Saturday, June 5, 2010

Chocolate Chip Cookie Dough Cheesecake Bars

I've had my eye on these Chocolate Chip Cookie Dough Cheesecake Bars for a few years, ever since I first saw them over at Bake or Break. I finally decided it was time I make them and I'm sure glad I did! These bars are absolutely amazing. The graham cracker crust has little speckles of miniature semisweet chocolate chips which takes it to a whole new level. The filling is a super rich and creamy vanilla cheesecake that is spotted with little chocolate chip cookie dough balls. After baking, the whole thing is drizzled with melted semisweet chocolate chips. The combination is absolutely brilliant!

I baked mine in an 8-inch square pan because I don't have a 9-inch pan. I'm honestly not sure how long I ended up baking my bars because I never heard my kitchen timer go off after the suggested 30 minutes and, frankly, I wasn't really paying attention to the time so these little puppies could have been in the oven 31 minutes or 45. I honestly have no idea, but they turned out perfect. When I pulled them out of the oven the cheesecake filling was still wobbly everywhere except the very edges. Once these cool overnight in the fridge, they finish setting up and you have the most rich and creamy cheesecake filling.

I almost didn't want to cut into the bars and ruin their pretty little drizzled chocolate topping.

But these bars looked too delicious to resist.

I was absolutely smitten with the cute little specks of mini chocolate chips in the graham cracker crust.

Finally I couldn't resist any longer, so I cut into the bars and served myself up a slice. I admired the smooth, creamy appearance of the filling.

And once again awed over the pretty crust. Then I took a bite and it was sheer heaven!

What I love most about these bars is that, while being incredibly rich, they aren't overly sweet. In my opinion these are perfectly balanced in flavor. The chocolate chip cookie dough balls add a nice contrast in texture to the super creamy filling. When really cold, the dough balls have a very stiff texture but they soften up a bit as the bars warm up. I think the flavors blend and harmonize when the bars are slightly warm but they are equally pleasant ice cold. These are absolutely delicious and I completely and wholeheartedly suggest serving them with a big glass of ice cold milk. Trust me.

Chocolate Chip Cookie Dough Cheesecake Bars
from The Essential Chocolate Chip Cookbook via Bake or Break

Crust:
1 1/2 cups graham cracker crumbs
5 tablespoons unsalted butter, melted
2/3 cup miniature semisweet chocolate chips
Preheat oven to 325°. Butter a 9″-square baking pan. Line pan with parchment paper, leaving enough to extend over the sides. Butter the parchment paper.
Combine graham cracker crumbs and butter until crumbs are moistened. Stir in chocolate chips.
Press crust mixture into bottom of pan and 1 inch up sides. Bake for 6 minutes. Set pan on wire rack to cool.
Cookie Dough:
5 tablespoons unsalted butter, at room temperature
1/3 cup packed light brown sugar
3 tablespoons granulated sugar
1/8 teaspoon salt
1 teaspoon vanilla extract
3/4 cup all-purpose flour
1 cup semisweet chocolate chips (I used miniature)

Using an electric mixer , mix butter, brown sugar, sugar, salt, and vanilla extract at medium speed until smooth. Decrease mixer speed to low and add flour. Mix just until incorporated. Stir in chocolate chips. Shape into teaspoon size balls. Chill while making cheesecake filling.

Filling:
10 ounces cream cheese, at room temperature
1/4 cup granulated sugar
1 large egg, at room temperature
1 teaspoon vanilla extract
Using an electric mixer, beat cream cheese and sugar just until smooth. Add egg and vanilla extract, beating just until blended.
Pour batter into baked crust. Drop cookie dough balls over the top of the filling.
Bake about 30 minutes, or until set but still wobbly in center. Transfer to wire rack to cool.

For chocolate topping, melt 1/3 cup semisweet chocolate chips in a double boiler or in the microwave (I melted them in a ziplock bag in the microwave). Add about 1/2 tablespoon of butter if necessary to make chocolate smooth. Drizzle over top of bars. Once the pan feels cool to the touch, chill the bars completely in the fridge overnight before cutting.
Using the edges of the parchment paper, remove bars from pan. Cut into bars and serve.

Friday, June 4, 2010

Win a $20 Gift Certificate from That Winsome Girl!

From now until midnight EST on July 3rd, send in a photo of yourself wearing your favorite That Winsome Girl design and you'll be entered to win a $20 gift certificate!

You can enter one of two ways:
1. Upload a "fan photo" to the That Winsome Girl Facebook fan page.
OR
2. Email a photo to thatwinsomegirl(at)gmail(dot)com as an attachment with "That Winsome Girl Fan Photo Giveaway" in the subject line.

Details:
*All entries must clearly highlight the participant wearing a That Winsome Girl design.
*Entries will be assigned a number according to when they were received. These numbers will be entered into a random number generator and a winner will be randomly chosen and announced on July 4th.
*Anyone and everyone may enter. You may submit as many photos as you like, but there will be only one entry per participant.
*The winner will receive a gift certificate code which will be redeemable for purchases made online ONLY via the That Winsome Girl Etsy shop. The gift certificate must be redeemed by midnight EST October 3, 2010 or it will become invalid.
*By entering, you permit That Winsome Girl to use your photo for promotional purposes. (Please contact me if you are firmly opposed to your photo(s) being used and I'd be happy to make an exception.)

I look forward to receiving all your wonderful entries!

Thursday, June 3, 2010

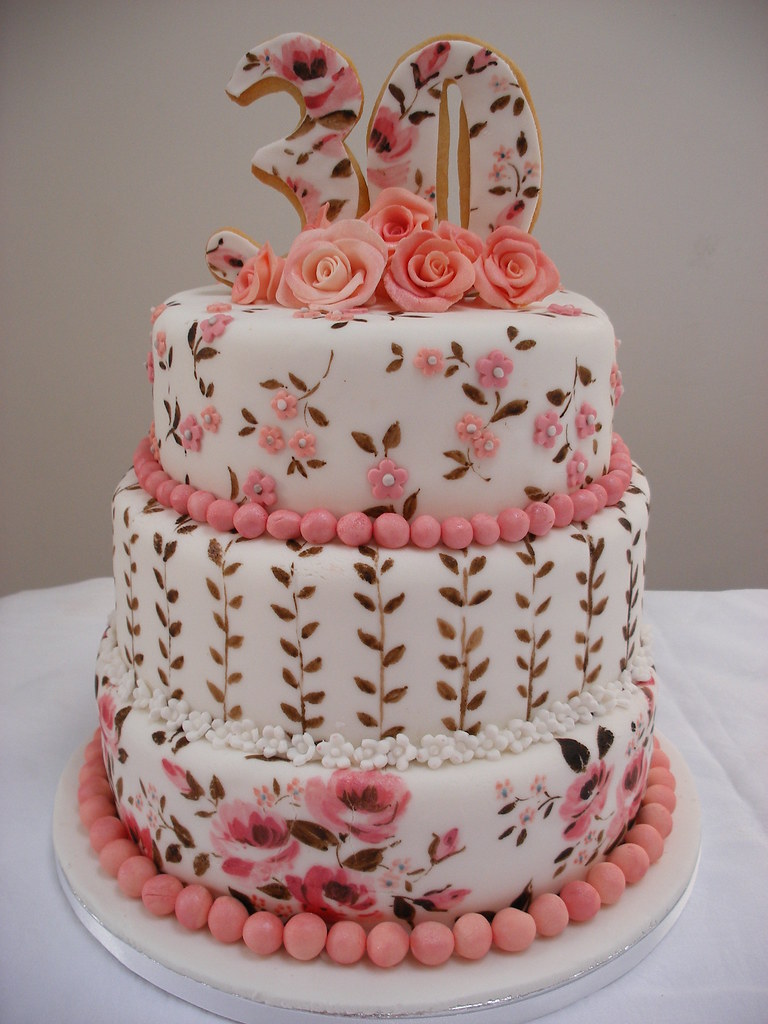
Not Quite 30...

{Click photo for source.}

Is this not one of the most beautiful birthday cakes you've ever seen?! All those floral details are painted on by hand. It's such a work of art. While I'm not turning 30 (I'm actually 23 today), and I won't be having any dessert that could even compare to the beauty of this cake, I expect to have a happy and low-key birthday. Tonight the hubby and I are celebrating by having dinner out. I haven't completely decided where I'd like to go (he's so picky and we're still on a budget despite celebrating), but I'm thinking we might try Azur which was suggested to me by a friend. We'll be celebrating with the hubby's family on Sunday for which I'll probably bake some cute cupcakes or something of the sort.

My life is so full of excitement and uncertainty and potential at the moment. I am so blessed to have a wonderful, loving and supportive husband, great family and friends, and the ability to pursue my passions. God has truly blessed me in my 23 years of living.

Wednesday, June 2, 2010

Featured on decor8!

Heather of Gathering Spriggs featured my work today in a guest post on decor8. Check it out here along with the work of four other amazing Etsy artists!

Tuesday, June 1, 2010

Share Your Favorite Home Decor Blogs

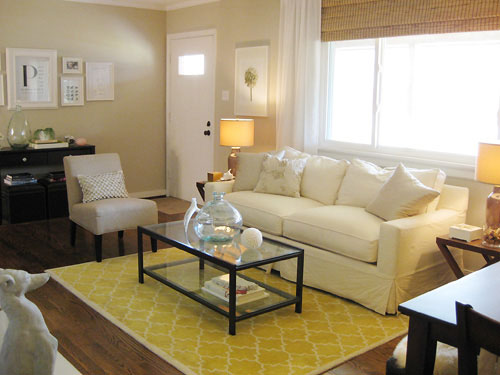
Photo of Young House Love's John and Sherry's gorgeous living room!

In the midst of searching for a rental home, I am dreaming of a future (hopefully not too long) down the road where I'll slowly be able to purchase new furniture and actually decorate our home. The past two years the hubby and I have been living in a very old, very neglected apartment in a converted 100 year-old-home. I graduated a year ago and the hubby just graduated this May. In the past two years while living here the only furniture we have purchased are a cheap kitchen island (bought with housewarming gift cards) and two ugly bedside tables we got in a yardsale for $10. Our apartment is a hideous mismatch of hand-me-down furniture and bachelor style pieces my husband purchased from Goodwill before we even met. Nearly half of the furniture pieces we do have are broken. I've never had the opportunity to buy furniture or even really decorate a room. I find that I am drawn to a couple different visual styles and I'm afraid I won't be able to decide on a cohesive decorating style when I am finally able to indulge in decorating.

One of my dream furniture pieces found by Rachel of Smile and Wave.

There is a huge part of me that has the urge to decorate everything in florals and sweet candy colors, but I know that outside my studio and kitchen, my husband would never let me indulge in this girly style (and honestly, I'm not sure I would want to let myself either). I also enjoy the clean, modern, nature-inspired look from folks like John and Sherry of Young House Love. I think I could please my husband with a simple, understated style along these lines but part of me craves a bit more character and whimsy. This is where the trouble comes in. I've seen so many homes featured on blogs like Design*Sponge and Apartment Therapy that I've loved that I can't even pinpoint what I'd like for myself and my home. I am set on mixing new and vintage pieces in our home to create a unique look (and also to save money by buying used). I really love the look of mid-century pieces mixed in with inexpensive new furniture with simple, clean lines. I think I'll probably bring in some whimsy via accessories and art, that way I can change things around without breaking the bank if we ever decide to go for a different look.

I love the whimsy and vintage vibe of this workspace of Liz of say YES! to hoboken.

I do have a general idea in my head of how I'd like to style my home, but I'd like to start an inspiration folder on my computer to keep an extensive inspiration resource at my fingertips. So, I'm hoping you all will be willing to share some of your favorite home decor blogs with me, and/or share photos of some of your favorite spaces! I'm definitely most interested in spaces that are welcoming and cozy with a bit of whimsy. I'd really love to see spaces that blend vintage and new pieces beautifully and make use of budget-friendly resources such as Target and Ikea. Thanks so much! I look forward to seeing all your favorites!
Related Posts Plugin for WordPress, Blogger...

Share Buttons