Showing posts with label baking. Show all posts

Monday, February 2, 2015

Peanut Butter Bomb Brownies

I've been following a strict Paleo "diet" the past few weeks and have really missed traditional baking.  While I truly do love the taste of a lovingly crafted homemade baked good, a huge part of my love for baking is really just the process of transforming sugar and flour into something beautiful and drool-worthy.  My husband and I both work primarily from home, so I don't have the opportunity to bake for coworkers or other folks too often.  Thus, I was in serious baking withdrawal.

Then Super Bowl comes along.  Now, I couldn't care less about football and it's been nearly ten years since I even watched a Super Bowl game (and then I only paid attention during the commercials and studied during the game).  Nonetheless, I married a man who loves the Super Bowl and gets rather invested in his Fantasy leagues, so every year we throw a big party on Super Bowl Sunday.

This year we went the casual route and bought some grub from hubby's favorite local BBQ joint, but I knew I wanted to bake something decadent and yummy!  A year or so ago I had seen these delicious Peanut Butter Bomb Brownies from Capital City Bakery featured on an episode of Unique Sweets.  I adored the way the bakery had decorated the brownies and couldn't get the flavor combination out of my head.  I was so excited to use Super Bowl as an excuse to finally create my own brownie inspired by the Capital City Bakery treat.


I knew I wanted to use the famous "Baked Brownie" as the base for my treat.  I've tried a handful of brownie recipes over the years, but I always come back to this one.  It's incredibly rich and chocolatey, slightly dense and fudgy, and just irresistible.  Cut yourself a piece from the middle of the pan and you'll think you died and went to heaven.  I'm drooling just thinking about it.


I chose a light and fluffy peanut butter buttercream packed with flavor: it's bold, but not overwhelming.  The frosting isn't sickeningly sweet either, which keeps the richness of the dessert balanced.  If you like the sweet, slightly salty combination of chocolate and peanut butter, you have got to try these!  While I didn't think the Baked Brownie could get any better, the buttercream takes these over the top.


As inspired by the original, I piped the buttercream on and decorated mine with mini chocolate chips, chocolate sprinkles, and a drizzle of ganache.  To save time, you could also use an offset spatula to frost the brownies before slicing.  I highly recommend the addition of the chips, sprinkles and ganache.  Not only are they a pretty addition, they add a really lovely textural experience.

Please, do yourself a favor and make these brownies!  They're going to be on my go-to list for desserts from now on.  I have some friends who are incredibly fond of peanut butter desserts and I can't wait to make these for them the next time I have a chance.

Peanut Butter Bomb Brownies
inspired by Capital City Bakery
makes 24 brownies

Ingredients

For the brownies:
1 1/4 cups all-purpose flour
1 teaspoon salt
2 tablespoons dark unsweetened cocoa powder
11 oz. dark chocolate (60 to 72% cocoa), coarsely chopped (I used these baking bars)
1 cup (2 sticks) unsalted butter, cut into 1-inch pieces
1 teaspoon instant espresso powder
1 1/2 cups granulated sugar
1/2 cup firmly packed light brown sugar
5 large eggs, at room temperature
1 tablespoon pure vanilla extract

For the peanut butter buttercream:
1 cup (2 sticks) unsalted butter, at room temperature
1 cup creamy peanut butter
1 teaspoon vanilla extract
2 1/2 cups powdered sugar, sifted
pinch of salt
1/4 cup heavy cream, more or less as needed

For the chocolate ganache drizzle:
1/2 cup mini semi-sweet chocolate chips
3-4 tablespoons heavy cream

mini semi-sweet chocolate chips and chocolate sprinkles, for decoration

Directions

To make the brownies:

Preheat your oven to 350°.  Butter and line a 9x13" baking pan with parchment paper, letting the extra paper stick out over the sides of the pan (this will make removal of the brownies later a breeze).

Sift together the flour, salt, and cocoa powder into a medium bowl; set aside.

Gently heat the chocolate, butter, and instant espresso powder together in a large heatproof bowl over a pan of simmering water, stirring occasionally, until the chocolate and butter are completely melted.  Turn off the heat and add the sugars, whisking for a minute or two, until completely combined.  Remove the bowl from the saucepan.

(The mixture should be room temperature or ever so slightly warm.)  Add three eggs to the chocolate mixture, whisking to combine, followed by the remaining two eggs.  Switch to a spatula and stir in the vanilla.  Lastly, sprinkle the flour mixture over the chocolate and fold it in just until the last bit of flour mixture is combined.  Do not over mix or your brownies will become cakey.

Pour the batter into the prepared pan and smooth the batter with the spatula.  Bake in the center of the preheated oven for 30 minutes, rotating the pan halfway through baking to ensure even cooking.  The brownies are done when a toothpick inserted into the center comes out with a few moist crumbs.  In my opinion, it's better to err on the side of underdone when it comes to brownies, so keep an eye out as to not over bake them.

Set the hot brownies on a cooling rack and let them cool completely before removing them from the pan.  Once cool, cut them into 24 squares and decorate.  If not cutting and decorating immediately, cover the pan of brownies with plastic wrap and store at room temperature for 1-2 days before frosting and serving.

To decorate my Capital City Bakery inspired brownies, I piped on a generous amount of the prepared peanut butter buttercream in a diagonal zig-zag motion with an Ateco 803 round tip then immediately sprinkled the tops of the brownies with mini semi-sweet chocolate chips and chocolate sprinkles.  A drizzle of chocolate ganache is the final touch.

To make the peanut butter buttercream:

In the bowl of a stand mixer, beat together the butter and peanut butter on medium speed until pale and fluffy, 3-5 minutes, scraping down the sides of the bowl as needed.  Next beat in the vanilla extract, sifted powdered sugar, salt.  Beat for a few minutes, slowly adding the heavy cream, until your desired consistency is reached.  At this point taste your buttercream.  You may want to add more powdered sugar, salt, and/or heavy cream depending on how sweet and thick you'd like your frosting.  The ratio above was perfect for me: light and fluffy, not overly sweet and slightly salty--a perfect compliment to the rich chocolate brownies.

To make the ganache:

I recommend making the ganache at the very end, once the brownies are frosted and decorated with the chocolate chips and sprinkles.

In a small microwave safe bowl, gently heat the mini chocolate chips and heavy cream over 1/2 power, stopping every 20 seconds to stir the mixture.  Only heat as long as needed to fully melt the chocolate.  You  may want to add additional cream, depending on how thin you'd like your ganache drizzle.  I added 3-4 tablespoons which yielded a ganache that eventually set slightly firm.  Next time I'll probably add an additional 1-2 tablespoons of cream for a silkier finish.

I transferred the ganache to a piping bag fitted with a small round tip to make drizzling easier.  You could use a zip lock bag with the very tip cut off, or a spoon for a more rustic effect.

Sources:

Brownie adapted from Baked: New Frontiers in Baking

Buttercream loosely adapted from Cooking Classy

Ganache loosely adapted from Cooking Classy


*This post contains affiliate links.

Saturday, December 28, 2013

White Velvet Cutouts {My Favorite Christmas Cookie}

I hope you all had a warm and merry Christmas!  I've had a rather busy holiday season this year and I didn't get to spend as much time in the kitchen baking as I would have liked.  However, no Christmas is complete in my eyes without making a batch of White Velvet Cutouts.

 I first introduced these cookies on my blog back in 2009 when I shared my history with these delicious cutouts.  Having originally stumbled across the recipe in an issue of Taste of Home magazine, I fondly remember making these with my mom around Christmas nearly every year of my childhood.  While they are delicious and perfect for any occasion, to me they epitomize the holiday season.

I assume these cookies get their "Velvet" name due to their gloriously soft, melt-in-your-mouth texture.  A generous amount of cream cheese in the batter gives them a beautiful texture and an unique flavor that is utterly addicting.  Growing up, my mom and I would skip chilling the dough and shape these with a cookie press.  I tend to favor rolling and cutting them out as the original recipe recommends.  Either way will produce a delicious cookie (heck, you can even portion them with a cookie scoop and flatten them slightly before baking).  You can cut them out into any shape you wish and color the frosting however you desire, making these truly perfect for any occasion throughout the year.

I hope you'll give these cookies a try soon.  I'm fairly certain they won't disappoint and they'll quickly earn a place among your favorites on your holiday cookie tray.

White Velvet Cutouts
adapted slightly from Taste of Home
yield: about 7 dozen cookies

For the cookies:
2 cups (4 sticks) unsalted butter, room temperature
1 (8 oz.) package cream cheese, room temperature
2 cups granulated sugar
2 large egg yolks
1 1/2 teaspoons vanilla extract
4 1/2 cups all-purpose flour

For the frosting:
3 1/2 cups powdered sugar, sifted; divided
4 tablespoons unsalted butter, room temperature
1/2 teaspoon vanilla extract
4-5 tablespoons whole milk or heavy cream; divided
food coloring and sprinkles (optional)

For the cookies:
In the bowl of a stand mixer, cream together the butter, cream cheese and sugar until light and fluffy.  Add the egg yolks and vanilla; mix well.  Gradually add the flour, mixing until just combined.  Divide dough into two disks, wrap well with plastic wrap and chill for 2 hours, or until firm.

Roll the dough out on a floured surface to 1/4-inch thickness.  Cut into desired shapes with cookie cutters; place 1 inch apart on parchment lined baking sheets.  Bake at 350° for 10-12 minutes or until set (but not browned).  Cool 5 minutes on the pan, then remove to wire racks to cool completely.

For the frosting:
Combine the butter, 1 1/2 cups of powdered sugar, vanilla, and 3 tablespoons milk or cream in the bowl of a stand mixer; beat on medium-low until smooth.  Gradually add the remaining sugar; beating until light and fluffy, about 3 minutes.  Add 1-2 additional tablespoons milk/cream and food coloring, until frosting reaches desired consistency and color.  Use an offset spatula or knife to spread a layer of frosting over the cooled cookies.  Immediately top with sprinkles, if desired.  Store in an airtight container.

After a few hours, the frosting will set and the cookies may be gently stacked for storage.

Monday, December 2, 2013

Mini Pumpkin Pies

I recently treated myself to a mini Tartlet Baking Set from Williams-Sonoma that I had had my eye on for well over a year.  The set includes a pan with wells for 12 miniature tarts and a coordinating cutter and tamper for shaping almost any sort of pie/tart dough imaginable.  I first tested out the pan using some leftover graham cracker dough I had on hand and made little graham cracker tarts that I filled with a lemon-cream cheese filling and topped with whipped cream.  They were adorable and a hit.

I was thrilled with how easy and effortless the Tartlet Baking Set was to use and I couldn't wait to use it with more recipes.  Recently I catered a little spread of desserts and sandwiches for a friend's baby shower and among the desserts, I made these Mini Pumpkin Pies for the very first time.  I adapted a Bakerella recipe for use with my new baking set and topped mine with a stabilized Vanilla Bean Whipped Cream (the stabilizing technique picked up from Baked Bree has become my favorite way to insure long-lasting whipped topping on all my homemade treats).

The Mini Pumpkin Pies were utterly adorable, perfectly tiny 2-3 bite treats and they were a huge hit with the folks at the shower.  I fell in love with the look and the recipe and I couldn't wait for an opportunity to make them again.

Fast forward a few weeks to this past weekend and I decided to whip these up to take to a late Friendsgiving dinner.  Fortunately I had several leftover and could take a few photos to share with you all here on the blog.  These Mini Pumpkin Pies are a new favorite of mine and I expect I'll make them quite a lot over the coming years.  Don't let the small size of the pies full you, they pack a punch of flavor along with their stunning presentation.  Give these a try even if you're not a fan of pumpkin pie (I'm not usually), the filling gets a unique twist with the addition of cream cheese and these are almost a pumpkin pie/cheesecake hybrid.  So freakin' delicious!

I know Thanksgiving is over, but these would be perfect for any holiday gathering or just because... even in the middle of summer... because they are that good.

Mini Pumpkin Pies
adapted from Bakerella and Baked Bree
yield: 3 dozen mini pies

For the Pies:

3 Pillsbury Refrigerated Pie Crusts (1.5 packages)
8 oz. cream cheese, room temperature
1/2 cup sugar
1 cup canned pumpkin
2 large eggs
1 teaspoon vanilla extract
1 teaspoon pumpkin pie spice

Preheat your oven to 350°.

In the bowl of a stand mixer, using the paddle attachment, mix together the cream cheese, sugar, canned pumpkin, eggs, vanilla, and pumpkin pie spice until well combined (but don't over mix).  Set aside.

Unroll one of the prepared pie crusts onto a sheet of wax paper or a lightly floured surface.  Using the cutter from the Williams-Sonoma Tartlet Baking Set, cut out 12 portions of dough from the crust.  Center each piece of crust on top of the wells in the tartlet baking pan, then use the provided tamper to carefully compress and shape each individual tart (making sure to press gently, but firmly until the crust reaches the top of the pan).

Spoon the pumpkin filling into each prepared crust until about half full (1 to 1 1/2 tablespoons of filling per crust).

Bake the filled pies in the preheated oven for 14-16 minutes, until the filling is puffed and the crust is lightly golden.

Allow the pies to cool for a minute in the pan, then remove them to a cooling rack to cool completely.

Place the baking pan in the freezer to quickly cool it, and repeat with the second and third pie crusts.

Allow the pies to cool completely, then store in the refrigerator while preparing the Vanilla Bean Whipped Cream topping.


For the Vanilla Bean Whipped Cream:

1 tablespoon cold water
1 teaspoon unflavored gelatin
1 cup very cold heavy whipping cream
3 tablespoons granulated sugar
1 teaspoon vanilla bean paste

In a small bowl, sprinkle the gelatin over the cold water and stir.  Let the gelatin stand for a minute until it is absorbed by the water.  Microwave the gelatin mixture on high for 15-20 seconds, or until the gelatin has melted and the mixture is clear.  Set aside.

In the bowl of a stand mixer, begin whipping the heavy cream with the whisk attachment on medium-high speed until it begins to thicken.

Gradually add in the sugar, a tablespoon at a time, and continue whipping until soft peaks form.

Next, add in your vanilla bean paste and liquified gelatin mixture and continue whipping until stiff, silky peaks form (do not over whisk or the mixture will become curdled).

Transfer your whipped cream to a piping bag fitted with a large star tip and pipe a small star of whipped cream atop each Mini Pumpkin Pie.  Serve immediately or refrigerate up to three days.*

*Similar to a cheesecake, I have found that the texture and taste of the pumpkin filling is best after these have had 6-8 hours to chill in the fridge.  These can certainly be served immediately, but the pumpkin filling is more mild in flavor until it has chilled in the fridge for a few hours.  Therefore, I recommend making these the night before you plan to serve them.  With the stabilized Vanilla Bean Whipped Cream, these keep exceptionally well for up to three days.  Around the third or fourth day, the crust begins to soften a bit and separate from the filling, but they are still delicious.

Wednesday, September 11, 2013

Basic Banana Bread {with a hint of bourbon and spice}

Typically when I have a bunch of bananas becoming ripe faster than I will consume them, I freeze them for use in smoothies; however, every now and then I decide to make banana bread.  Today was one of those days.

While I certainly enjoy banana bread that has been dressed up with chocolate chips and walnuts or pecans, today I decided to go with a more classic recipe: not nuts or chocolate, just a hint of spice.

Basic Banana Bread like this seems so classic and really hits the spot.  It's moist and sweet and full of banana flavor.  Sometimes I like to enjoy mine toasted with a smear of butter.  Along side a cup of coffee in the morning or afternoon: you can't go wrong.

This recipe is subtly spiced with cinnamon, nutmeg, and cloves.  I don't taste a big kick of spices in the finished bread, but they add a nice, gentle warmth.  There is also a little splash of bourbon in the recipe.  The bourbon is completely optional and, honestly, I really couldn't taste it in the finished product.  But, I mean, any excuse to throw a little bourbon in your dessert can't be bad.  Am I right?

Basic Banana Bread
adapted slightly from Smitten Kitchen

3-4 ripe bananas, smashed (I used four)
1/3 cup unsalted butter, melted
1 cup light brown sugar, loosely packed
1 large egg, beaten
1 teaspoon vanilla extract
1 tablespoon bourbon (optional)
1 teaspoon baking soda
1/4 teaspoon salt
1 teaspoon cinnamon
1/2 teaspoon nutmeg
pinch of ground cloves
1 1/2 cups all-purpose flour

Preheat the oven to 350°.  Spray a 4x8 loaf pan with cooking spray or grease with butter.

In a large mixing bowl, mash the bananas with the melted butter.  Stir in the sugar, egg, vanilla and bourbon, then sprinkle in the spices, salt and baking soda and mix well.  Add in the flour and stir until just combined.

Pour the batter into the prepared pan and bake for 50-60 minutes, or until a toothpick comes out clean.  Cool in the pan for 5 minutes, then remove to a rack to cool completely before slicing.

Thursday, September 5, 2013

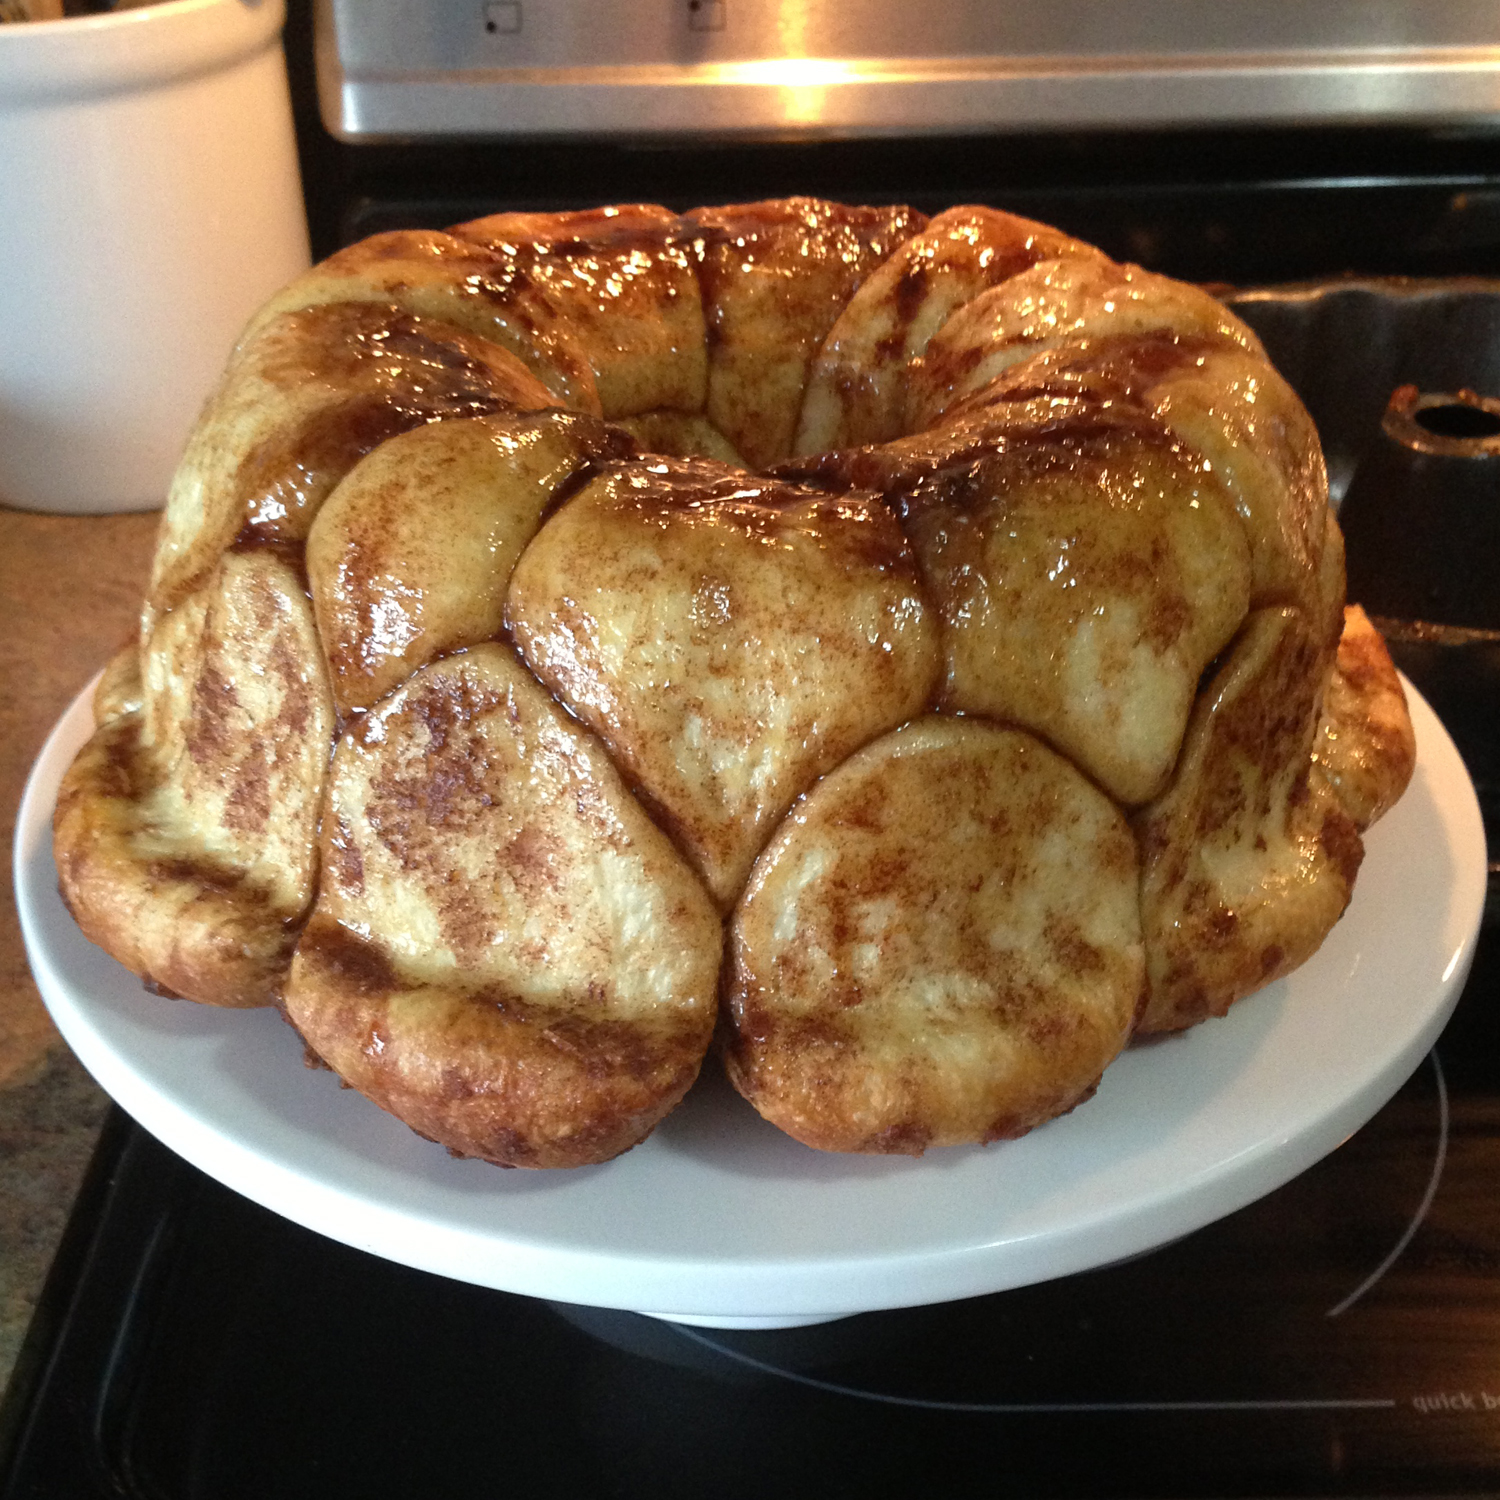
Overnight Monkey Bread with Cream Cheese Icing Glaze

 
Today is my hubby's 28th birthday.  While we don't usually make a big deal about breakfast in our house (neither of us eat breakfast at all most days), I like to plan a little something special on birthdays and special occasions.  I've been eyeing a Monkey Bread recipe from Jenny Steffens Hobick for a couple of months and was excited to give it a try for breakfast this morning.

I've made and enjoyed Monkey Bread in the past; however, growing up all the versions of Monkey Bread I ever encountered were made from canned biscuits.  They were certainly yummy, but there is a little something off-putting about the taste of most canned biscuits (metallic, bitter) that always bugs me a little bit.  I hadn't even heard of using yeast dough for Monkey Bread until I read Jenny's recipe, but I was utterly intrigued.

The fantastic thing about this recipe is it's so stinkin' easy and convenient.  You use frozen, uncooked yeast rolls for this recipe and all the prep can be done the evening before in about 15 minutes.  The bread is left to thaw and rise on the counter overnight and is perfectly puffed and ready for baking in the morning.  I decided to whip up a little Cream Cheese Icing Glaze (think Cinnabon) to top my bundt cake to make it a little more festive and also to add a little extra sweetness and flavor.  While the Monkey Bread is great on it's own, I think the glaze definitely adds something extra and is worth the effort.

If you do decide to make this Monkey Bread, make sure you give it plenty of time in the oven.  I made the mistake of pulling mine out a little too soon (the outside looked perfect, but the inside was still a little doughy).  Mine was gorgeous and tall right out of the pan but began to shrink a little bit as the undercooked dough flatted.  It was still yummy though, especially the pieces that finished baking.  I'm definitely going to be making this again soon (possibly for a little brunch party I'm hosting later this month) and am glad I found this new version of Monkey Bread to love!

Overnight Monkey Bread
via Jenny Steffens Hobick

24 rolls of frozen uncooked yeast rolls (Rhodes brand)
1 stick of unsalted butter, melted
1 cup of light brown sugar
2 tablespoons of cinnamon

Spray a bundt pan with non-stick spray.  Melt the butter in a bowl in the microwave.  In a separate bowl, combine the brown sugar and cinnamon.  Roll the frozen rolls in the butter, then in the sugar mixture.  Place the coated rolls neatly in the bundt pan.  Cover loosely with a clean towel or plastic wrap and leave in warm spot overnight to rise (about 8 hours).

The rolls should have doubled in size in the morning.  Bake the rolls on a sheet pan in a 350° oven for 25-30 minutes, until golden brown.  Make sure to cook the monkey bread thoroughly.  The top pieces may appear down before the bottom has completely finished baking.  If needed, cover the top of the bread with foil to prevent burning during the last 5-10 minutes of baking.

Cream Cheese Icing Glaze
adapted from AllRecipes.com

3 oz. cream cheese, room temperature
1/4 cup butter, room temperature
1 1/2 cups powdered sugar, sifted
1/2 teaspoon vanilla extract
pinch of salt
1 tablespoon whole milk

While the monkey bread is baking, beat together the cream cheese, butter, sugar, vanilla and salt.  Once thoroughly combined, add a tablespoon of milk to reach a drizzling consistency.

Once the monkey bread is finished baking, allow it to cool in the pan for five minutes then invert it onto a serving plate.  Spoon, spread, pipe, or pour the icing glaze over the warm monkey bread, allowing the icing to melt and run down the sides of the bread.  You may not use all of the icing; add as much to your liking to the bread and serve any extra on the side for dipping.

Thursday, July 25, 2013

Mini Omelets (Soufflés?)

My goal was to make Mini Omelets using this recipe as a base and doing my own thing with the veggies.  What I got were more akin to mini soufflés...

I'm not sure what went wrong.

What started out as a humble mixture of eggs, egg whites, some lightly sautéed veggies, a bit of cheese and seasoning seemed straightforward enough.

The mixture was portioned into nine wells of a greased muffin tin and baked for 20 minutes at 350°.  As you saw in the in-oven photo above, somewhere along the line these guys decided to leave the omelet life behind and become high-rising soufflés.

Straight out of the oven, these little guys still had a lot of height.

But, as soufflés tend to do, they quickly began to deflate.  However, they never looked quite like I was expecting.

Don't get me wrong, these little guys still tasted great, they just weren't quite as picture-perfect as the inspiration.  I gave mine a little kick with the hot sauce from my July Taste Trunk, and they were mighty tasty.  For those who are interested, I'll share the recipe as I made it below, but perhaps you should refer to Gina's original post and expect the unexpected.

Mini Omelets (Soufflés?)
adapted from Skinny Taste
makes 9 mini omelets

1 teaspoon olive oil
1/2 green bell pepper, diced
1/2 red bell pepper, diced
1/4 white onion, diced
2 cloves garlic, minced
1 cup spinach, chopped
4 whole eggs
1 cup egg whites
1/4 cup reduced fat shredded cheddar cheese
salt, pepper, to taste
hot sauce, to taste (optional)
cooking spray

Preheat oven to 350°.  Spray a regular non-stick muffin pan with cooking spray and set aside.

In a nonstick pan, add oil and heat over medium-high heat.  Once pan is hot, add in the bell peppers and onion and lightly sauté for a couple of minutes, then add in the garlic and spinach and sauté for another minute, or until the spinach is wilted.  Remove from the heat to cool down.

In a medium bowl, whisk together the whole eggs, egg whites, cheese, salt, pepper, and hot sauce (if using).  Whisk in the cooled vegetables.

Portion the omelet mixture into 9 wells of the prepared muffin pan, filling each a little more than 3/4 full.  Bake in the preheated oven for 20 minutes.  Serve immediately.  Wrap any leftovers in plastic and refrigerate or freeze.

Tuesday, July 2, 2013

Red Velvet Sandwich Cookies

Sunday night was the season 8 premiere of Dexter, everyone's favorite serial killer.  Hubby and I have enjoyed having a couple of friends joins us over the past few years to watch Dexter.  Each week I like to prepare a couple of snacks for us to enjoy while we watch the show.  For season premieres and finales I like to plan drinks and recipes that are appropriate for the show (lots of blood red treats, etc.).  For last night's premiere I decided to try out these Red Velvet Sandwich Cookies which looked simple but sounded delicious.

The cookies themselves are quick and easy cake mix cookies.  They bake up beautifully, staying soft and chewy but still sturdy enough for sandwiching.  They're filled with a delicious homemade cream cheese frosting that is satisfyingly sweet and creamy.  These are a fairly simple but truly drool-worthy dessert.  The stunning contrast of the deep red crackled cookie against the bright white, smooth filling makes these an eye-catching treat.

Red Velvet anything is pretty classic here in the South.  These are great for so many occasions.  Dip the edges of the frosting in patriotic sprinkles and they'd make a gorgeous treat for the Fourth of July.  Of course, these would be amazing at Christmas or around Valentine's Day as well.  But, really, you can't go wrong with these red velvet sandwich cookies anytime of the year.  I mean, who needs an excuse to enjoy a giant sandwich cookie?

Red Velvet Sandwich Cookies
adapted slightly from Let's Dish

Cookies
18.25 oz box red velvet cake mix (I used Duncan Hines)
2 large eggs, lightly beaten
1/2 cup canola oil
2 tablespoons all-purpose flour

Filling
4 oz cream cheese, room temperature
2 tablespoons unsalted butter, room temperature
1 teaspoon milk (I used half-and-half)
1 teaspoon vanilla extract
2 cups powdered sugar, sifted

Preheat oven to 350 degrees.

To make the cookies, mix sift together the cake mix and flour, then stir in the eggs and oil.  Scoop* cookies onto a parchment-lined baking sheet.  Bake for 8-10 minutes in the preheated oven, rotating the sheet halfway through, or until the tops look cracked and the cookies have set.  Cool on the pan for a minute or two, then transfer to a cooling rack to cool completely before filling.

To make the filling, begin by beating together the cream cheese and butter until light and well combined.  Mix in the vanilla and milk, then beat in the powdered sugar until the mixture is completely smooth.  Using an offset spatula (or a pastry bag fitted with a large round tip), spread 1-2 tablespoons of filling onto the center of a cookie.  Top with a second cookie and press together until the filling reaches the edges of the cookies.  Serve immediately or refrigerate (if refrigerating, remove the cookies 1 hour before serving to allow the filling to come to room temperature).

*I used a 3 tablespoon cookie scoop which yielded 7 very large bakery-style sandwich cookies.  For smaller cookies, I suggest using a 1 1/2 to 2 tablespoon scoop.

I chose to double the filling to make sure I had plenty to generously fill my sandwiches.  I had about a cup of filling left over, so I wouldn't recommend doubling the recipe unless you want a lot of frosting.  I'd estimate that I filled each of my large sandwich cookies with about 3 tablespoons of filling.

Wednesday, June 19, 2013

(How to Throw a Homemade) Ice Cream Social

As I mentioned in this post, I turned 26 earlier this month.  I celebrated on my birthday by hosting a little cookout with the family.  Due to lots of vacations, etc. most of my close friends were out of town around my birthday so I decided to throw a belated Ice Cream Social to celebrate with them last weekend.

After a couple of months of very casually planning via my Pinterest board, I began active prep for the party one week prior to the event.  In addition to six different flavors of homemade ice cream, I also made Hot Fudge, Butterscotch Sauce, Brownies, Chocolate Chip Cookies, and a big batch of Vanilla Lemonade for the event.  I found that a little scheduling helped everything come together effortlessly.  Since homemade ice cream can be frozen for a week or so without any adverse change in texture, the bulk of the prep for a gourmet ice cream social can be done in advance and/or slowly over the course of the week before the party.  As such, an impressive Ice Cream Social can be executed with much less stress than the typical food-oriented party.  I thought in addition to sharing photos from my Ice Cream Social, I'd also share with you the recipes I made and my prep timeline.

Exactly one week prior to the party (day one), I hit up the farmer's market for some local strawberries and also stopped by the grocery store to buy the ingredients for all the ice cream, etc.  That day I made the base for the first batch of ice cream for the party (Strawberry), as well as the Hot Fudge and Butterscotch Sauce.  I also made some eggless cookie dough for Double Cookie Dough Ice Cream.

On day two of party prep, I churned the Strawberry Ice Cream and made the base for Double Cookie Dough Ice Cream.  On day three, four, five, and six, I simply churned the ice cream base I had made the day before and make the next ice cream base to be churned on the following day.  So each day a batch of ice cream was churned and placed in the freezer, the bowl to my ice cream maker was cleaned and frozen, while the base for another ice cream was made and chilling in the fridge.  On day seven (the day before the party), I churned the final ice cream flavor, baked Brownies and Chocolate Chip Cookies, made Vanilla Lemonade, and chopped up some cookies for toppings.  The day before the party, I also made sure to do any necessary yard work (since I was throwing the party outdoors) and set up the (bare) tables, chairs, etc. for the event to lighten my work for the day of.

{I snapped this photo before the ice cream, etc. had been placed on the dessert table}

Saturday morning, the day of the party, I decorated a little bit for the party and got all the food and drinks ready to be carried outside once guests had arrived.  Just before the party was scheduled to begin, I warmed the Hot Fudge and Butterscotch Sauce gently in the microwave.

Once guests arrived, I filled up the dessert table with the ice cream, toppings, etc. and we dug in!  From the six flavors of ice cream I made (Vanilla Bean, Chocolate, Strawberry, Toasted Marshmallow, Cake Batter, and Double Cookie Dough) and the various treats and toppings, there were countless cone, sundae, and ice cream sandwich combinations to be made.

I built what I deemed the S'more Sundae: a Brownie base, topped with Toasted Marshmallow Ice Cream, a drizzle of Hot Fudge, and a sprinkle of crushed Graham Crackers.  It was divine.

Unfortunately the day of the party turned out a little bit warmer than expected with a beaming sun.  Shortly after everyone had their share of ice cream, we decided to move indoors.  All in all, it was a great party and everyone seemed to enjoy the ice cream!  There was even a request to make it a yearly event... so I may just have to start planning next year's Ice Cream Social.

Continue reading if you'd like to know the specific recipes I made for the event and a detailed timeline of my preparation.  If you have any questions about anything I made, any of the decor, etc., leave a comment and I'll be happy to answer them!

Thursday, March 21, 2013

World Peace Cookies

Take a seat folks, I have to tell you about these cookies.  First of all, let me say that they're named World Peace Cookies for a reason.  These humble-looking treats are so transcendentally delicious that they could stop conflicts, end wars, and bring about world peace.  Okay, maybe that's a slight exaggeration, but trust me, these cookies are epic.  Dark with the deep flavor of rich cocoa, packed with rustic bittersweet chocolate chunks, and surprisingly yet fantastically salty, these cookies are a unapologetically bold and sensational.  I promise you won't be able to eat just one (unless you hate chocolate, in which case I feel sorry for you).

Confession:  I made these cookies twice in four days.  I baked the first batch last Saturday with full intent to get photos of them to share here on the blog.  Then hubby surprised me by announcing we were hosting last minute company for an evening game night and I got derailed with cleaning and wasn't able to get photographic evidence before the cookies were devoured.  So, naturally, I made another batch just a few days later.

The first time around, I followed Dorie's recipe exactly while the second time, out of curiosity, I made a couple of minor adjustments that Jamie of My Baking Addiction had suggested (decreasing the flour by 1 tablespoon while increasing the butter by the same).  While Jamie's suggestions made the dough a little easier to work with, I preferred the slightly sharper look of the cookies made following the original measurements.  Both tasted fantastic.

These cookies are really a simple slice-and-bake dough.  They're great to keep on hand in the freezer for unexpected company or a sudden, intense chocolate craving.  Bake a batch and, if you can bring yourself to do so, share a few.  Spread a little peace and love and chocolate.

World Peace Cookies
recipe by Dorie Greenspan via bon appétit
makes about 36 cookies

1 1/4 cups all-purpose flour
1/3 cup unsweetened cocoa powder
1/2 teaspoon baking soda
11 tablespoons unsalted butter, at room temperature
2/3 cup packed light brown sugar
1/4 cup granulated sugar
1/4 teaspoon fine sea salt
1 teaspoon vanilla extract
5 ounces bittersweet chocolate, chopped into chips

Sift flour, cocoa, and baking soda into medium bowl. Using electric mixer, beat butter in large bowl until smooth but not fluffy. Add both sugars, vanilla, and sea salt; beat until fluffy, about 2 minutes. Add flour mixture; beat just until blended (mixture may be crumbly). Add chopped chocolate; mix just to distribute (if dough doesn't come together, knead lightly in bowl to form ball). Divide dough in half. Place each half on sheet of plastic wrap. Form each into 1 1/2-inch-diameter log. Wrap each in plastic; chill until firm, about 3 hours (may be refrigerated up to three days).

Preheat oven to 325°F. Line 2 baking sheets with parchment paper. Using thin sharp knife, cut logs crosswise into 1/2-inch-thick rounds. (The cookies may crumble and break while slicing, but have no fear, just press the rounds back together and they'll be perfect.) Space 1 inch apart on prepared sheets. Bake 1 sheet at a time until cookies appear dry (cookies will not be firm or golden at edges), 11 to 12 minutes. Transfer to rack; cool completely then store in an airtight container at room temperature for up to three days.

Tuesday, March 12, 2013

Dutch Baby (aka German Pancake)

I have a confession to make.  I rarely eat breakfast (unless you'd count coffee around noon).  It's not that I don't enjoy breakfast foods or appreciate the energy boost I get when I actually take the time to eat something in the morning.  I'm just a notorious late riser and most days I'd simply rather wait until lunch than bother to cook something first thing in the morning.  Please tell me I'm not the only one?

When I do decide to make breakfast it has to be quick and effortless.  Yogurt and berries or coffee and granola.  Something that requires little more than a pour here and a stir there.  If I make something from scratch chances are it was a baked good that I prepared ahead of time and kept in the freezer, requiring nothing more than putting said item on a baking sheet and popping it in the oven.  These Dutch Baby Pancakes take a little more effort than that, but even I don't mind the five minutes of prep these require.  They're a fantastic weekday morning breakfast option that leaves you infinitely more satisfied than a bowl of cold cereal.

All you need to do is simply melt a little butter in a cast iron skillet while you blend up a few ingredients.  Once your butter is melted and your pan is hot, you pour in the batter and pop the pan in the oven for 20 minutes while you make yourself a cup of coffee, do your hair, get a few extra minutes of sleep... whatever.

This isn't your typical American flapjack.  The Dutch Baby is essentially a glorified morning popover.  The pancake puffs up in the oven and immediately begins to deflate upon removal.  It's a real site to behold (I imagine little ones would be mesmerized).  It's a little eggy and custardy, and is complimented well with sweet additions: powdered sugar, maple syrup, sweetened whipped cream, and fresh berries.  If you're looking for a quick and easy new recipe to add a little interest to your mornings, this might just be a winner.

Dutch Baby
via Cooking Classy and Chef in Training
serves 2-4

3 large eggs
1/2 cup all-purpose flour
1 tablespoon granulated sugar
1/4 teaspoon salt
1/2 cup whole milk
1/2 teaspoon vanilla extract
2 tablespoons butter

optional, for serving:
maple syrup
powdered sugar
fresh berries
whipped cream

Preheat oven to 400 degrees.

In a blender, combine eggs, flour, sugar, salt, milk, and vanilla.  Process until smooth.

Place the butter in a large cast iron skillet or pie dish and place in the oven to allow butter to melt completely and for the pan to get hot (about five minutes).  Working quickly, remove the pan from the oven and slightly tilt and swirl to evenly distribute the melted butter across the bottom (but not the edges) of the pan.  Pour the batter into the hot skillet and return to the oven.  Bake for 20 minutes until puffed and golden.

Remove from the oven and cut into 4-6 pieces and serve warm with maple syrup, powdered sugar, fresh berries, and whipped cream (or whatever you heart desires).

Tuesday, March 5, 2013

DIY Gift Idea: Present Homemade Cookies in Mason Jars

Yesterday I shared the recipe for these delicious Lemon Shortbread cookies.  As promised, I'm back today to share the details of how I packaged them so they'd be gift-worthy and protected for mailing.  I've always been smitten with the way Miette packages their graham crackers and I wanted to create something similar for my shortbread cookies.  Searching my mind for an appropriate, affordable straight-sided round container, I remembered the wide mouth pint size mason jars I had recently used for a few craft projects and thought they'd be perfect!  Turns out I was right.

I used a 2 5/8" scalloped cookie cutter from this set for my cookies and they fit perfectly in the jars.  My cookie dough had been rolled to 1/4" before cutting and I found that a dozen of the cookies fit beautifully inside the mason jars.  Depending on your recipe and your cookie cutters, you should be able to mimic these results.  This technique is great for packaging any crisp, thin cookies (shortbread, graham crackers, chocolate wafers, etc.) but you could also stack thicker cookies for a more rustic effect-though you'll fit less in your jar.

Here's what I used:

1 dozen cookies, rolled 1/4" thick and cut with a 2 5/8" scalloped cutter (I used Lemon Shortbread)

Pint size wide mouth Ball mason jar

6"x6" square piece of fabric

Ribbon to coordinate with your fabric

Handmade chalkboard tag (an unfinished wooden tag painted with chalkboard paint)

Chalk pen (to label the tag)

To assemble your jar for gifting, carefully stack your completely cooled cookies in your jar.  Top the mason jar with it's lid (the flat disk).  Next, center your fabric square on top of the lid and hold it firmly in place while you attach and screw on the band (this is the part that screws onto the jar).  Cut a piece of ribbon with plenty of excess for tying and run it through the hole on your tag.  Position the ribbon neatly around the jar and tie it securely and finish with a bow.  Cut off any extra length from your ribbon ends and that's it!

This will provide a safe and attractive way for you to gift any number of homemade cookies for birthdays, holidays, or just anytime you feel like lifting someone's spirits with homemade cookies.  The options for decorating your jar are limitless, though I personally think the chalkboard tags are darling and you can't go wrong coordinating your fabric and ribbon to the cookies you're gifting (such as my yellow theme for the lemon cookies).

There is something so wonderful about treating someone to a dozen homemade cookies.  What better way to present them than in a darling mason jar that can be reused time and again!


*I'm joining The Scoop Link Party.  Check out all the other fantastic submissions here.

Monday, March 4, 2013

Lemon Shortbread

My husband and I recently participated in a Snack Exchange through Reddit.  We were assigned to send snacks to someone who simply requested, "Fruity, Sour, Sugar!"  My hubby suggested that, in addition to some unique store bought treats, that I make something homemade to send to our match.  Being a little nervous about shipping homemade desserts for the first time, I decided to choose a sturdy recipe that would stay fresh for at least a week.  My first thought was shortbread, and to incorporate the "fruity, sour" request, I thought lemon would be a lovely favor choice.

I wanted to stick with a very simple, traditional shortbread and this recipe from Today's Nest looked perfect...  And perfect it was!

When working with such a simple ingredient list, it's ever so important to use high quality ingredients.  I used Plugra (a high quality European style butter) for the first time making these shortbread and the result was divine.  These shortbread are melt-in-your-mouth tender, oh so buttery, and subtly tart from the lemon zest.  The flavor is humble yet heavenly.

To get uniform sized cookies, it's important to carefully roll your dough to an even thickness.  I use this rolling pin and it makes rolling out cookies, pie doughs, etc. effortless.  Once your dough is rolled out, you can cut these shortbread into any shape you desire.  I used a 2 5/8" scalloped cutter from this set and was able to get 16 cookies out of this recipe before rolling scraps.  I kept a few of these cookies for us to enjoy and sent the rest off to our Snack Exchange match.

With a little careful planning, I discovered that I could perfectly fit a dozen of these delicious shortbread cookies into a mason jar for safe travels.  Check back tomorrow where I share details and ideas on how to package these cookies for gifting!

Lemon Shortbread
via Today's Nest

1 2/3 cup all-purpose flour
1/3 cup corn starch
1/4 teaspoon salt
1 cup unsalted butter, room temperature
1/2 cup confectioner's sugar
1 teaspoon vanilla extract
1 tablespoon lemon zest (more or less, to taste)
lemon sugar (optional)*

Preheat oven to 325 degrees.

Sift together the flour, corn starch, and salt in a medium bowl and set aside.  In the bowl of a stand mixer, beat the butter and sugar together until smooth, about 1-2 minutes.  Beat in the vanilla extract and lemon zest until just combined.  With the mixer on the lowest speed, gradually add the flour and mix until just combined.  Do not overmix.

Remove the dough from the bowl and form into a flattened disk; wrap in plastic wrap and refrigerate for 1 hour.

On a lightly floured surface, roll the dough out to 1/4 inch.  Cut out shapes with cutter of your choice.  Place cut cookies on a parchment lined baking sheet at least 1 inch apart.  Sprinkle with lemon sugar, if using.  Refrigerate for at least 15 minutes before baking.

Bake the cookies for 14-16 minutes, or until very lightly browned.  Allow cookies to cool on pan for 1 minute, then transfer them to a wire rack to cool completely.

Store in an airtight container for up to a week.

*If you can't find lemon sugar in your area, or don't want to shell out for such a specific ingredient, you can leave these cookies plain or top them with regular demera sugar for a similar effect.

Wednesday, February 27, 2013

DIY Gum Paste Flowers Tutorial

As promised in yesterday's post, I'm back today to share with you a little casual tutorial on how I like to make simple gum paste flowers to adorn cupcakes.  I've had several inquiries in the past (particularly from photos of these cupcakes) on how I make my gum paste flowers.  They're actually very easy to create as long as you have a few basic tools and ingredients.  They add a lot of interest and personality to an otherwise plain cupcake and, when stored properly, they last for positively ages.
 
To make your gum paste flowers, you'll need gum paste, of course.  You can buy ready-to-use gum paste to save yourself time, but I prefer to use a gum paste mix and make mine fresh as I find the prepared gum paste often tends to be a little dry and difficult to work with.  Also, when I use the mix I can control how much I make at once (usually I make about 1/4 batch at a time, unless I'm making a ton of flowers).  In addition to your gum paste,  you'll need a little shortening to grease your work surface and gel food coloring if you wish to color your gum paste.  If I am trying to match the color of something (such as the cupcake liners in this case), I like to keep that close as I'm tinting the gum paste to have as a reference.

You'll also need a few tools for rolling and shaping your flowers.  A small rolling pin is handy for rolling your gum paste out.  You'll also need flower-shaped cutters.  The one I used for the flowers shown in this tutorial is a plunger style cutter (like these) which makes removing your cut gum paste from your cutter much easier while leaving a small dot which will conveniently act as a guide later on when creating your flower center.  If want to do any shaping of your flowers, you'll need a gum paste tool set and a shaping foam set.  I also find a storage board helpful to keep your cut flowers from drying out before you shape them.  You certainly don't need a board like this, a piece of plastic wrap placed on top of your cut flowers will work just the same.  I have a storage board that was purchased as part of a set and I do find it handy and convenient.  While purchasing these tools can get pretty pricey, if you enjoy using decorative flowers to adorn your desserts, making them yourself will save you money in the long run.  I purchase all my tools and ingredients from Michael's taking advantage of 40% and 50% off coupons.

Now that you know what tools and ingredients you'll need, let's get started.

Prepare your work surface by coating it with a very thin layer of shortening.  This will prevent your gum paste from sticking to your surface.  I like to work on a small silicone mat, but a clean, smooth counter will work just fine.

(Not pictured) If desired, next you'll tint your prepared gum paste.  I recommend using caution when coloring your gum paste and only adding the tiniest amount of gel food coloring at a time.  This stuff is pretty potent, especially when working with a small amount of gum paste, and it's easy to add too much too quickly and completely ruin the color you're going for.  If you're afraid of mistakingly going too dark, one trick I suggest is to start off my cutting off 1/3 to 1/4 of your gum paste and setting that aside (keep it covered while you work so it doesn't dry out).  If you end up going a little too dark, you can add in the white gum paste you reserved and it'll help lighten your mixture back up a bit.  To tint your gum paste, use a tooth pick to add a tiny amount of food coloring to your white gum paste and knead it gently until the color is completely homogeneous.  Keep repeating this process, adding a tiny bit more coloring at a time, until you have achieved the desired shade for your flowers.

Once you've tinted your gum paste to the perfect shade, use your rolling pin and roll it out to ~1/16th inch.  To be honest, I never measure the thickness of my gum paste.  I just kind of eyeball what looks to be about right.  I might suggest measuring this on your first attempt until you get a feel for the proper thickness.  If you don't roll your gum paste thin enough, you'll have awkward cubby little flowers.  Too thin and they'll be weak and difficult to shape.

After you have rolled your gum paste out, use your cutter and cut out as many flowers as you need.  As you cut them, place them under the plastic flap on your storage board, or cover them well with plastic wrap.  You'll want to protect them from drying out while you work so they'll still be malleable enough to shape.  You may also want to cover your rolled gum paste with plastic wrap while you work as well.  The key to working with gum paste is to move fast and keep everything protected from the air until you actually want your flowers to dry out.  With exposure to air, they'll begin to dry and will become difficult to shape.

Your cut flowers are now ready for shaping.  This step isn't necessary but it provides your flowers with a more realistic appearance and also gives your flowers a little personality and character.  For the first step of shaping the individual petals, I like to use the thin foam piece from the shaping foam set and the dual ended rounded shaper from the gum paste tool set.

The process of shaping the petals is a little difficult to describe and capture in a still photograph.  Basically you want to place the ball from the small end of the round shaping tool in the center of a petal and, while lightly applying pressure, move the tool in a circular motion.  This serves to add dimension to the petals.

 Then place your flower on the thicker piece of foam from the foam shaping set and, using the larger end of the round shaping tool, apply gentle pressure to the center of the flower again moving the tool in a circular motion.  This creates a gentle cupping effect and gives your flowers a sweet rounded appearance.

Repeat this process with each of your cut flowers.  Once they have all been shaped, set them aside to dry for an hour or two.

Once your flowers are dry, it's time to add a little detail to their center to finish them off.  My favorite way to decorate the center of my flowers is to use small sugar pearls which I adhere with a "glue" made from mixing 1 teaspoon of merginue powder with 1 tablespoon of water.  I use a small paint brush to dot a little bit of this "glue" to the center of my flower, then place a sugar pearl on top and very gently press it into place.  Allow the "glue" to dry and your sugar pearl will be firmly adhered to your flower.  Another option for decorating the center of your flower is to use royal icing or other decorative sprinkles or small candies.

After adding your sugar pearl centers, give the "glue" another 30 minutes to 1 hour to dry.  Then your flowers are ready to adorn your delicious dessert creations!  If you want to make these in advance, they keep beautifully stored in an airtight container in a cool, dry, dark place.  I'd say these keep fairly indefinitely, but, to be safe, I'd recommend using them within a week or two of the time you make them.

I am certainly not a professional and these flowers definitely don't require a lot of skill to make.  I find their simple shape pleasing and I appreciate that they're fairly quick to make.  While elaborate gum paste flowers are truly works of art, for my everyday cupcakes I prefer to keep thing simple and these sweet flowers are just what I need!  With a modest investment in a few tools, you too can whip up these sweet little adornments and add some decoration to your cupcakes, petit fours, etc.  This is just my technique on how I like to make my favorite gum paste flowers.  I hope you found it helpful and that it's inspired you to experiment with gum paste as well.
Related Posts Plugin for WordPress, Blogger...

Share Buttons