Friday, June 26, 2009

Gemstone Shopping and Another Event

The Kentucky Proud Art Fair went quite well last Saturday. While the wind was a force to be reckoned with and several of my displays got damaged (nothing a little elbow grease can't fix), the show was a great success! Unfortunately with the wind issues I was pretty preoccupied after getting set up so I didn't get a chance to photograph my new display. I am hoping to capture some nice photos soon. I am now frantically preparing for the Lexington Fourth of July festival. I was accepted as a juried artist to show at Triangle Park in Lexington from 9am until 6pm on July 4th as part of the Vine Street Festival. One source claims that last year's festival saw over 150,000 visitors, thus I am expecting a busy, successful day!

I have been ordering lots and lots of new supplies as my stock has been painfully low. I ordered some gorgeous gemstones to pair with three vintage brooches which will become one of a kind necklaces.

This gorgeous pink chalcedony briolette is from The Curious Gem on Etsy. I will be pairing it with a lovely vintage Catamore 12K gold-filled brooch with a sweet ivory rose. I am planning on accenting the necklace with some wire wrapped freshwater pearls.

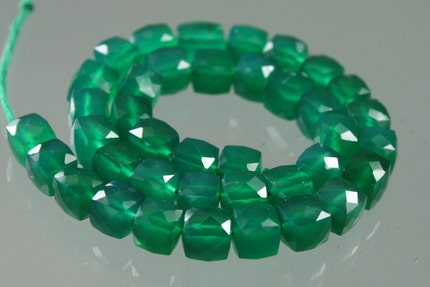
These stunning green onyx cube beads are from Stoney Marie Gemstones, also on Etsy. They will be paired with a vintage Van Dell 12K gold-filled rose brooch with an ivory rose. I am planning on placing the brooch asymmetrically on one side of the necklace and wire wrapping these gorgeous beads at the bottom of the drape. I will also use a few to make a pair of matching earrings.

Lastly are some beauitful deep amethyst cube beads also from Stoney Marie Gemstones. I will be using these similarly to the green onyx beads above. They will be paired with a vintage sterling silver bow shaped brooch which will be placed asymmetrically with the amethyst wire wrapped to drape beautifully. A pair of matching earrings will also be made.

I am really excited about these new gemstones and can't wait to see how the designs turn out.

Thursday, June 18, 2009

Kentucky Proud Art Fair

Unfortunately I have been a bit MIA lately. I have been busy working. I only have 3 free Saturdays all summer, as all the others I am booked for various fairs and festivals. It is exciting but a bit overwhelming. I need to invest in two new tables for my studio. I currently have two and a desk, but the two tables I use are also my display tables for shows and I have to clear them of my work and take them down every week for shows, then put them back up so I can work. It's a wee frustrating. I also had some laptop issues this past weekend, and thanks to Dell's incredibly awful technical support, it took me one system restore and about 6 phone calls to convince Dell that I needed a keyboard replacement. They wouldn't listen to me during my initial call when I described my issues and insisted it was a keyboard problem. They forced me to restore my system and go through about a million steps before they were convinced the keyboard didn't work. At any rate, a technician came on Tuesday, replaced the keyboard in a couple of minutes and all the problems were resolved. I'm glad I finally have a functional computer again, but I have yet to find the time to move all my files and documents back to my laptop.

Anyway, speaking of shows... I will be participating in the Kentucky Proud Art Fair which will be hosted by Good Foods Market & Cafe in Lexington this Saturday from 10am until 2pm. I have been working this week of tweaking my stud earring display and I am quite delighted with the result. I cannot wait to see how it looks with the rest of my set up this weekend. Today I am going to be busy making some new pieces for the show. I am planning on focusing my time on making bracelets, more stud earrings and perhaps some cute rings with vintage buttons. I need to design some new dangle earrings as well. I have been a bit limited with my designs lately as my supply stock is running incredibly low. I need to order lots of new vintage pieces as well as some more sterling and gold fill findings. I will have to do some serious supply shopping in the next few days. I was accepted as a juried artist for the Lexington Fourth of July Festival, which should be quite a busy show. I am planning on designing lots of new pieces to debut at the festival. Hopefully I'll be able to share sneak peaks with you along the way.

I will be bringing my camera to the Kentucky Proud Art Fair this weekend. I plan to finish setting up a good 15 minutes before the fair starts so I can *hopefully* capture some decent photos of my set up. I really need to have pictures of my display for future applications. I'll be sure to share them with you all here as well.

Tuesday, June 16, 2009

BLT Sliders with 60-Minute Dinner Roll Buns

Last Saturday while I was downtown for the Artist Market, I crossed the street to the Farmer's Market looking for something to have for breakfast. I found a delicious croissant with French bittersweet chocolate chips. Before I headed back to my booth, I decided to purchase some amazing tomatoes I had seen. I had plenty of bacon left from some bacon wrapped chicken breasts I had made for myself and the hubby the night before and, since I had been craving BLTs for months, knew what had to be done.

Using some leftover Kitchenaid 60-Minute Dinner Rolls I had also made for the previous night's dinner, I turned the tomatoes into some seriously delicious BLT Sliders. They were so good, I had them for dinner two nights in a row, until my tomatoes were gone. These are perfect for lunch or a light dinner and they would be so cute for a summer cookout! You could certainly save time making these by simply using store bought dinner rolls, but I definitely recommend this roll recipe as it is lightning fast and so good. I also recommend getting the best, freshest tomatoes and lettuce you can. Anytime you recipe has so few ingredients, you always want to use the best ones you can find.

BLT Sliders

Kitchenaid 60-Minute Dinner Rolls (recipe below)
fresh, local tomatoes
romaine lettuce
Hellmann's low-fat mayonnaise
kosher salt & freshly ground black pepper, to taste

Cut each bacon strip into thirds. Cook bacon to your preferred crispness. Drain on paper towels while preparing the sliders.

Cut dinner rolls in half. Spread a thin layer of mayonnaise onto the top and bottom buns.

Wash, dry and slice tomatoes and lettuce.

To assemble sandwiches, place one tomato slice per slider onto the bottom bun. Sprinkle tomato slice with kosher salt and a grind or two of pepper. Place 3 pieces of bacon (equal to one whole bacon slice, as they were cut into thirds before cooking) on top of the tomato. Top with lettuce and top bun.

I find that 1 whole piece of bacon per slider is sufficient, though you can certainly adjust the ratio of ingredients if you'd like. I always place my tomato slice(s) directly next to the mayonaise on my bun/bread when making BLTs because I love when the tomato juice and mayonaise mix. You end up with this magical mixture that drips onto your plate, and tastes sooo good when your bread is dipped into it.

Kitchenaid 60-Minute Dinner Rolls
makes 24 rolls

1/2 cup fat-free skim milk
1/4 cup sugar
2 teaspoons salt
3 tablespoons butter
7 teaspoons instant yeast (roughtly 3 packages of dry active yeast)
1 1/2 cups warm water (105F – 115F)
6 cups all-purpose flour (I used half all-purpose and half bread flour, because I ran out of AP)
In a small saucepan, stir milk, sugar, salt and butter together. Heat over low heat until butter melts and sugar dissolves. Cool until lukewarm.
Dissolve yeast and a pinch of sugar in warm water in a warmed mixer bowl. Add lukewarm milk mixture and 4 1/2 cups flour to yeast mixture, and using a dough hook, mix on low speed for about 1 minute. With the mixer still going, add remaining flour, 1/2 cup at a time, and mix about 1 1/2 minutes, or until dough starts to clean the sides of the bowl. Knead on low speed for about 2 more minutes, or until dough is smooth and elastic – the dough will still be slightly sticky to the touch. If needed, knead by hand for an additional minute to make sure all incredients are well combined and do is smooth and elastic.
Place dough in a greased bowl, turning it to grease the top. Cover the dough with a clean, dry dish towel, and let it rise in a warm place, free from draft, for about 15 minutes.
Turn the dough onto a lightly floured surface, and divide into 24 equal pieces. Form each piece into a ball, and place in two greased 9x13 pans. (I'm sure you could also bake these on a greased or parchment lined baking sheet as well.) Cover the pans with dish towels, and let the dough rise for about 15 minutes.
Bake at 425ºF for 12 minutes, or until the rolls are golden brown. Remove from the oven and brush the tops with melted butter (2 tablespoons is perfect for 24 rolls), then return them to the oven for an additional minute. Remove the rolls from pans immediately, and cool on wire racks.
Once completely cool, store in an air-tight container. You can also freeze the rolls, if desired. Place them on baking sheets in the freezer until hard, then place them in a zip lock bag and return to the freezer for up to a month (trust me, they won't last that long). These can be quickly and deliciously reheated straight from the freezer by heating in the microwave on high for 20 seconds-30 seconds.
You could certainly half or fourth the recipe.

Thursday, June 4, 2009

Birthday Fruit Tart

My 22nd birthday was yesterday and it was amazing! To celebrate, I was originally planning on making an ice cream cake. I didn't get started until late Tuesday evening and I realized I only had enough cream for one small batch of ice cream, not nearly enough for a whole cake. So, not wanting to walk across the street to Kroger while it was storming, I decided to abandon the ice cream cake idea (though I did make a delicious batch of vanilla bean ice cream). Then I got the idea to make a fruit tart. I have wanted to make my own fruit tart since I worked in the bakery at Fresh Market a year ago.

This was my first full size fruit tart. I modified a recipe I have actually made on a number of occasions as mini tarts. The hubby and I both love this recipe and so have those who tried it. I wanted to do more of a traditional fruit tart, but I didn't have the time to make pastry cream and I didn't want to try a whole new recipe and foreign techniques when I was pressed for time and needed a guaranteed delicious dessert. I ended up sharing this tart with friends and family at what was my first ever surprise party and my first birthday party since I was little. The day was unforgettable!

Shortbread and Lime Curd Tart
serves 8

Crust:
1 cup (2 sticks) unsalted butter, room temperature
1/2 cup confectioner's sugar
1 teaspoon pure vanilla extract (I used homemade)
1 1/2 cups all purpose flour
2 tablespoons cornstarch
1/8 teaspoon salt

Filling:
2 8oz. packages cream cheese, softened to room temperature
1/2 cup + 2 tablespoons lime curd
4 tablespoons confectioner's sugar
Various fruit toppings (I used blackberries, strawberries, and golden kiwi)

Tart:
Preheat oven to 325 degrees. Lightly brush 9 1/2 inch tart pan with melted butter.

In the bowl of an electric mixter, cream the butter and sugar until fluffy. Beat in the vanilla extract. Add the flour, cornstarch, and salt until just combined. Press dough into prepared tart pan. Place in freezer for at least 10 minutes. This lets the dough rest and will help it hold its shape while baking. Poke holes in crust with tines of fork. Place a piece of parchment paper over the tart shell and fill with pie weights, dry beans or rice. Place in oven for 10-15 minutes, until edges are lightly golden brown and set. Carefully remove the parchment paper from the pie and place back in the oven for 5-10 minutes until center of tart is golden brown.* Place on a wire rack to cool completely. Once cool, move tart shell to the refrigerator until ready to fill and decorate.

*Baking time may vary. According to my oven thermometer, it is always under temperature. The tart may brown quickly and be ready after 20 minutes in the oven. Mine took almost 30 minutes to finish browning.

Filling:
Beat cream cheese and sugar until fluffy. Next, beat in the lime curd until smooth. If the filling is too tangy, beat in 1 tablespoon sugar at a time until desired sweetness is achieved. If more tartness is desired, add one tablespoon of lime curd at a time until pleasantly tart. Refrigerate until ready to assemble tart.

Assembly:
Fill cooled crust with filling and level top until smooth. Decorate with desired fruit(s). Refrigerate until ready to enjoy.

My husband and I have always loved this recipe in mini form, but I must say I prefer the full size version as it is quite breathtaking with the beautiful fruit. This recipe is pretty versatile. You can adjust the tartness of the filling to your liking, and try making it with lemon or lime curd. And there are about a million options for fruit toppings. This is a great, fast recipe as the different components come together very quickly. Let me know what you think if you try it!

Wednesday, June 3, 2009

How Sweet of You to Say, Etsy!

I went to Etsy today and received quite the sweet blessing...

Do you see it?

That's right, I'm 22 today!
Related Posts Plugin for WordPress, Blogger...

Share Buttons