Thursday, August 30, 2012

September 2012 Julep Maven Box

Today I wanted to share the contents of my September Julep Maven Box.  I've been a subscriber of the Maven program since it launched in August of 2011.  The Julep Maven program is unique from other beauty subscriptions in many ways (which I think make it a superior service).  First of all, when you sign up for the Maven program, you take a style quiz which suggests which types of products and shades of polishes will best suit your personality and style.  There are five style profiles that receive different products and polish shades each month.  Personally, I find the style profile for the Maven program to be pretty spot on; however, if you aren't crazy about the products you're going to get on a given month, you have a few options.  You can view the four other styles and the products for them for that month.  You can choose to pick a different style/box that month, or you can skip the month entirely if nothing suits your tastes that month or you're trying to cut back on spending.  I truly think this option of picking a different style or skipping the month is a brilliant feature and I really wish other subscription services were so kind as to offer similar choices for their members.  The Maven program has the best model out there that I've experienced myself.  Since I joined the program I have been nothing but satisfied with the products I've received and the service itself.


Most months the Maven boxes contain at least two polishes and usually one other non-polish beauty or mani/pedi product.  You are always guaranteed to receive at least $40 of products for the $19.99 subscription cost.  Another perk of being a Julep Maven is that anytime you make a purchase from the Julep online shop, you receive a 20% discount.  I could really sing praises about Julep all day long.

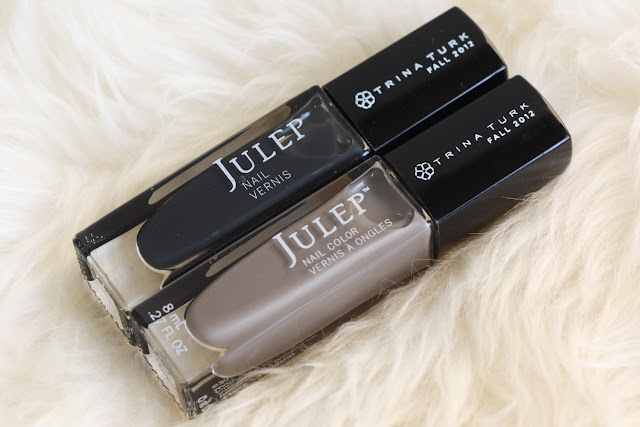
This month the Maven boxes were inspired by Trina Turk's Modernist Maverick Collection and were full of stunning colors for fall.  This month I decided to stick with my usual style profile, Classic With a Twist, which included two neutral polishes and a new product from Julep, a volumizing mascara.

 The polishes I received were Brandt, an opaque off-black creme, and Sophie, a chic truffle mushroom creme.  I absolutely adore these shades and they will certainly be staples for me this fall.  I've been wanting to purchase a good black polish for a while (I have a cheaper one from Revlon and the formula is a pain, so I never use it) and Brandt is perfection.  I love the slightly off-black shade, which makes it a little less harsh than a straight up black.  And, as with most Julep polishes I've tried, the formula is brilliant: one coat is really all it takes to reach full opacity.  Sophie is a shade that couldn't fit my personality any better.  I absolutely adore warm gray/greige shades year round and this one is stunning.

The American Beauty Volumizing Mascara has lash growth enhancement ingredients and a micro-fiber applicator that claims to separate, condition, and plump individual lashes for a thick and gorgeous finish.  I'm really excited to try this mascara as it will be the first (of the countless mascaras I've tried) to contain fibers.  I can't wait to see the effect this creates, and I think this was a really interesting addition to the Maven box.

I'm over the moon about the products I received in my Julep Maven Box this month.  To be honest, I have skipped the past few months with the Maven program because I wasn't too over the moon about a lot of the nail trends from spring/summer.  Now that fall and winter are approaching, I have a feeling I'm going to find it difficult to resist the gorgeous colors of the upcoming seasons.

If you're a nail polish/mani/pedi junkie, I highly recommend you check out the Julep Maven program.  It's really risk-proof since you receive an email preview of your box every month and have the option to purchase, choose another box, or skip the month.  If only other subscription services were so straightforward.

Tuesday, August 28, 2012

Chicken Enchilada Pizza

When I decided to add Beer Can Chicken to the list of recipes I was going to try out for the week, I immediately knew I wanted to save the extra chicken for a pizza.  I had been meaning to try making a Chicken Enchilada Pizza for quite some time and when I saw this amazing version from Gimme Some Oven, I knew I had whip one up for myself.

I used Ali's pizza as inspiration but decided to do my own thing with the toppings.  I wanted something quick and simple to throw together and, since I've been excited to try out some of the products at the new Trader Joe's in Lexington, I decided to take a few shortcuts and utilize some of their products.  I used Trader Joe's fresh, plain pizza crust and enchilada sauce for the base of my pizza.  I then topped it with a generous sprinkle of freshly grated cheddar jack cheese, leftover shredded Beer Can Chicken, thinly sliced red onion, and a little cilantro after baking.

The resulting pizza was delicious and, I have to say, I was pretty impressed with the Trader Joe's pizza dough and enchilada sauce.  I'm pretty picky about pizza crust and, though I've tried several recipes, have yet to find a traditional pizza crust recipe that I've enjoyed.  I think I'll stick with the Trader Joe's pizza dough in the future (besides, you can't be the price and convenience).

I went simple with the toppings this time, but I definitely think fire roasted corn, bell pepper, and black beans would be lovely additions.  Also, I highly recommend you add a few dollops of guacamole to your pizza before you chow down.  So good!


Chicken Enchilada Pizza
inspired by Gimme Some Oven

1 large unbaked pizza crust, homemade or store bought
1/2 cup enchilada sauce, homemade or store bought
2 cups freshly shredded cheddar jack cheese
1 cup shredded cooked chicken
1/4 large red onion, thinly sliced
handful of fresh cilantro, stems removed

Preheat oven to 400 degrees.  If using a baking stone, be sure to preheat it along with your oven.

On a sheet of parchment, top your shaped pizza crust with 1/2 cup (more or less, to taste) of enchilada sauce, spreading evenly but leaving a 1-inch border around the edge of the crust.  Layer the cheese, chicken, and red onion evenly over the sauce.

Carefully move the parchment paper/pizza to the preheated baking stone, or place on a large baking sheet and place in the preheated oven.  Bake for 10-12 minutes, or until the cheese is melted and the crust begins to turn golden brown.  Remove from the oven and sprinkle with fresh cilantro.  Slice and serve immediately.  Add a few dollops of guacamole and/or sour cream, if desired.

*Adjust the ingredients for the toppings as desired.  Try adding additional toppings (I suggest fire roasted corn, bell pepper, and/or black beans) or play around with the amounts to suit your tastes.

Monday, August 27, 2012

Beer Can Chicken

This weekend I made my first ever Beer Can Chicken.  A quick rub, a can of beer, and a little over an hour later and you'll have one delicious, moist chicken on your hands.  Hubby and I both adored this chicken and I'll definitely be making it again soon, though I'm curious to try a few tweaks next time to impart even more flavor into the bird.

When I make this chicken again, I'm planning to set it inside a cast iron skillet to help avoid flare-ups on the grill (you can also avoid them but keeping the burner directly under the chicken turned off, which is what I eventually did after a couple flare-ups).  The cast iron skillet will also allow me a nice spot to cook some potatoes around the chicken at the same time.  If I have them on hand, I may also add onion, garlic and perhaps some fresh herbs to the chicken cavity along with the beer can for extra flavor.

That said, this chicken is absolutely delicious as is.  The rub takes no time to throw together and you can keep extra on hand to make the prep process even faster.  I'm so glad I finally gave Beer Can Chicken a try as I now have a sure bet, crowd-pleasing chicken recipe I can make on the grill for summer cookouts.

Beer Can Chicken
slightly adapted from Food Network

Beer Can Chicken Rub:
1 tablespoon smoked paprika
1 tablespoon applewood smoked sea salt
1 tablespoon onion powder
1/4 teaspoon cayenne pepper
1 1/2 teaspoon ground cumin
1 teaspoon dried thyme
1 teaspoon dried oregano
1 teaspoon black pepper
1 teaspoon garlic powder

In a small bowl mix all the ingredients together.  You can store extra rub in an airtight container for up to 6 months.

For the Chicken:
4 lb. chicken, washed and dried
vegetable oil
Beer Can Chicken Rub
1 (12 oz.) can beer (I used Bud Light)

Preheat your grill to medium-high.

Rub the prepared chicken and its cavity down with the vegetable oil.  Season the chicken with the rub mixture, remembering to season the cavity as well.  Pour out 1/4 of the beer (or drink it, if you enjoy beer) and sit the chicken on top of the beer can.  Using the legs and beer can as sort of a tripod, carefully place the chicken in the center of the hot grill and cover.  Cook the chicken for 1 to 1 1/2 hours, or until an instant-read thermometer registers 165 degrees F.  Once cooked, cover loosely with foil and let rest for 10 minutes before carving.

*The rub recipe will make enough for at least two chickens.  Feel free to decrease the amount if only making one bird, or keep it on hand for another time.

Saturday, August 25, 2012

Gyoza (Japanese Potstickers)

I'm so thankful when I find a recipe I love that can be frozen and prepared quickly straight from the freezer.  These Gyoza (Japanese potstickers) freeze beautifully and make for a quick and delicious meal.  I like to serve mine with a simple dipping sauce and plain rice.  While the initial preparation of these potstickers can be time consuming if, like me, you're pleating them by hand, once they're shaped they take hardly any time or effort to cook.  The recipe makes a ton of gyoza, so you can make them for a crowd or freeze them for many meals down the road.  I look forward to making another batch of these soon to restock my freezer, but I think this time I'll invest in a dumpling press to make the shaping of these potstickers go a lot faster.

Gyoza
via Meal Planning 101
makes 72 dumplings

1 lb. ground pork
1 lb. bag of coleslaw (or 1 lb. cabbage finely shredded)
1 teaspoon fresh ginger, grated or minced
4 cloves garlic, minced
2 teaspoons sugar
2 tablespoons soy sauce
1 tablespoon sesame oil

1 package of gyoza skins
1/4 cup water
1 teaspoon cornstarch

Before you start making the gyoza, prepare your workspace.  Get out a large baking sheet and moisten a clean kitchen towel or paper towel until just damp.  In a small bowl mix together the water and cornstarch.

In a large mixing bowl mix together the pork, cabbage, ginger, garlic, sugar, soy sauce, and sesame oil until well combined.

To begin filling your gyoza, hold a dumpling wrapper in one hand.  Dip your finger in the cornstarch water and moisten all around the outside edge of the wrapper.  Place a heaped teaspoon of filling in the middle of the wrapper.  Fold the gyoza wrapper in half and pinch in the middle.  To make a pleat, you'll need to make a small fold to the left of the middle.  Pinch that together.  Make another fold to the left of the pleat you just made and pinch together.  Make the same pleats pinching them together on the other side until the dumpling is completely sealed.  In the palm of your hand or on a hard surface, stand the gyoza up and tap to make a flat bottom.

When you are all done folding and making the potstickers, you could at this point place your whole baking sheet in the freezer. The gyoza will freeze in about an hour or two and can then be placed in a ziplock bag. This prevents them from freezing into a big potsticker ball. When you are ready to use them, just pull them out of the freezer and add an extra minute or two for cooking time.

Whether cooking these fresh or frozen, get out a large non-stick skillet that has a tight fitting lid. Place a couple teaspoons of oil in the pan and turn the heat up to high. Get a 1/2 cup of water ready and place on the counter beside you. Place the gyoza in the pan on the flat side with their pleats sticking up. Depending on the size of your pan you should be able to fit about 12 or so into the pan (if I'm serving this as a meal for 4, I have two frying pans going at once). After about a minute or two the bottoms of the gyoza will be browned and crispy. Grab the lid to the frying pan in one hand and the 1/2 cup of water in the other. Quickly pour the water into the pan and put the lid on. Turn the heat down to low and set a timer for 10 minutes. The dumplings will finish cooking in the pan by steaming.

After 10 minutes remove the lid of the pan. If not all the water is gone let them sit another minute or two to let the water evaporate and let the bottoms of the gyoza get crispy again.  Remove from pan and serve the gyoza with your favorite dipping sauce.


Quick Dipping Sauce

1/4 cup soy sauce
1 tablespoon garlic chili paste

In a small bowl combine the soy sauce and garlic chili paste and stir until combined.

Friday, August 24, 2012

August 2012 GLOSSYBOX USA

If you aren't subscribed to GLOSSYBOX, get ready to be jealous, ladies.  The theme of the August GLOSSYBOX was Pure Luxury and I'd say they hit the nail on the head with this one!

"A balmy summer has come to a close and your body is in need of genuine TLC.  Pamper yourself in this month's GLOSSYBOX by nourishing your body from head to toe with rich, technologically-advanced products infused with vitamins, natural oils, and sublime color.  The exquisite selection of cosmetics will preserve your sun-kissed beauty, leaving you looking healthy and radiant.  As the season comes to an end, wrap yourself in pure luxury."

This month's GLOSSYBOX contained five products, including two full-size items!

 1. Biolage - Exquisite Oil Replenishing Treatment ($22.00/3.1 oz)
This treatment is a versatile serum infused with a Moringa Oil Blend.  This ultimate potion gives instant shine and weightless replenishment to all hair types.

Sample size: 0.16 oz
Sample value: $1.24

2. Ellis Faas - Ellis Lips ($35.00/0.095 oz)
The lightweight and long-lasting lip products come in three fabulous textures; creamy lips for a matte finish, milky lips for a gloss finish and glazed lips for a touch of color.  They are paraben-free, loaded with vitamin E and blend into the lips leaving them soft and conditioned.

Sample size: 0.095 oz
Sample value: $35.00

3. Illamasqua - Nail Varnish ($14.00/0.5 oz)
Award-winning, extremely hardwearing and chip-resistant, there's an Illamasqua Nail Varnish for every shade of humanity.  Apply two coats for extra intensity.  Make a statement and talk with your hands!

Sample size: 0.5 oz
Sample value: $14.00

4. Ole Henriksen - Truth Serum ($48.00/1.0 oz)
This high powered vitamin C complex helps smooth out lines and wrinkles, fights environmental aggressors and keeps your skin moisturized, nourished and protected.  Apply mornings and evenings.

Sample size: 0.5 oz
Sample value: $24.00

5. Touch in Sol - Feel like Honey Moon Skin Base ($20.00/1.13 oz)
Apply this fantastic primer after your skincare routine and before your makeup.  Its honey texture firms and revitalizes the skin and allows for better makeup application.

Sample size: 1.06 oz
Sample value: $18.76

Total box value: $93.00

Wow, GLOSSYBOX, just wow!  I simply cannot believe we received over $90 of great products this month.  They didn't kid when they claimed the Pure Luxury theme.  I'm so happy to try everything I received this month.  While the shades I received in the Illamasqua Nail Varnish (Radium) and Ellis Faas lip product (L109 Pale Coffee) aren't shades I'd probably pick up for myself, I'm excited to give them a try.  I think the Pale Coffee lip color will be a nice, warm nude shade for fall.  The nail varnish is a bit brighter and greener than I usually go for, but it's a unique color and I've been wanting to try an Illamasqua polish for ages and here's by chance to try out the formula before I splurge on one of their polishes.  I'm really looking forward to trying the hair and skincare items as well.  I'll let you know what I thought of everything in next month's post.

Monday, August 20, 2012

Orange Cloud Pancakes

I'm one of those people who rarely find the time or energy to make a nice, homemade breakfast (in the morning).  Most days I enjoy a coffee and maybe some cereal for breakfast, but rarely ever something lovingly prepared.  Homemade breakfasts are reserved for dinner around here.

Tonight I made Orange Cloud Pancakes and scrambled eggs for dinner.  These pancakes have a bright orange flavor and a light texture.  They're a really lovely change from the classic buttermilk pancake.  Topped with a pat of butter and some maple syrup, these are sure to bring a little deliciousness to your morning or evening (whenever you prefer to enjoy your favorite breakfast dishes).


Orange Cloud Pancakes
slightly adapted from The Curvy Carrot
serves 2

3/4 cup ricotta cheese
3 eggs, separated
4 tablespoons (1/2 stick) unsalted butter, melted
1 tablespoon fresh orange juice
1/2 teaspoon vanilla extract
1/2 teaspoon almond extract
pinch of cinnamon
pinch of nutmeg
1/2 cup all-purpose flour
2 tablespoons sugar
1/2 teaspoon salt
1 tablespoon orange zest

Combine the ricotta cheese, egg yolks, melted butter, orange juice, vanilla and almond extracts in a food processor and process until smooth, about 30 seconds.

Stop the processor and add the cinnamon, nutmeg, flour, sugar, salt and orange zest.  Process again until smooth and transfer the mixture to a large bowl.

Meanwhile, in the bowl of a stand mixer fitted with the whisk attachment, whisk the egg whites until stiff but not dry.

Using a rubber spatula, very carefully add one large scoop of the egg whites to the pancake batter, and lightly fold them together until smooth.

Gently fold the remaining egg whites into the batter until incorporated.

With a lightly buttered or sprayed nonstick pan or griddle on medium heat, scoop about 1/4 to 1/3 cup of the batter onto the pan and cook on each side about 1-2 minutes, until lightly golden.  Serve immediately.

Wednesday, August 15, 2012

August 2012 Birchbox

Warning: this post is going to be a Birchbox rant.  My August box arrived and it has to be the absolute worst Birchbox I've received in the year and a half that I've been subscribed.  This month two of the four samples I received were absolutely miniscule and what you can get for free by simply walking into a store and asking for a sample.  The other products I received are lackluster at best.

My August Birchbox included:

Juicy Couture - Viva la Juicy La Fleur ($70/2.5 oz)
This modern scent is a feminine blend of wild berries, mandarin, and waterlily.

Sample size: 0.05 oz
Sample value: $1.40

Stila - Stay All Day 10-in-1 HD Beauty Balm, Foundation & Concealer ($38/45ml and $44/1 oz & 1 g)
These multitasking favorites are your cheat sheet to flawless skin.

Sample size: 0.006 oz, 0.006 oz, and 0.003 oz
Sample value: $0.54

Whish - Shave Cream ($20/150 ml)
The organic shea butter in this foam-free shaving cream softens skin as you shave.

Sample size: not listed on product (1 oz or less)
Sample value: <$4

Yu-Be - Moisturizing Skin Cream ($16/1.25 oz)
This best-selling Japanese cream hydrates chapped lips, rough heels, and cracked hands.

Sample size: 0.1 oz
Sample value: $1.28

Extra - Schick Hydro Silk Razer ($9.99/1 razor)

Sample size: 1 razor
Sample value: $9.99

Total box value: <$17.21

First of all, I find it pathetic that the most valuable sample in my box this month is a drugstore razor.  Yes, a razor is a useful tool that I will most certainly use, but I do not want to receive a drugstore razor in my sample box of high end products that I pay for.  I am an avid couponer and I buy high quality razors from the drugstore and I pay less than a dollar each for them.  Thus the razor holds little to no value to me.

Receiving shaving cream in a box is disappointing to me.  I do not have sensitive skin and I will not, under any circumstances, be so blown away by a shaving cream that I will spend more than $0.50 for a bottle (again, I'm a couponer, so I get these toiletries for next to nothing).

The samples from Stila are so tiny that, besides the fact that they are much too dark for my porcelain skin, I couldn't even get a single full use out of them to see if I'd like the way they work for me.

The Yu-Be cream smells so intensely medicinal (think Vicks Vapor Rub) that I can't imagine I'd be inclined to use it unless I was ill.

The only sample this month that I find pleasant is the perfume, but this is such a tiny sample that I could easily get for free from Sephora, Ulta, or any department store.  This wouldn't bother me if at least a few of my other samples were decent.

As I've said before, my biggest complaint about Birchbox is their inconsistency between the value of the boxes and samples sent out to customers each month.  This month numerous boxes contained full-size PIXI makeup products (each valued at $18) among other samples.  Those boxes were above and beyond the value and worth of the box myself and others received.  I truly feel that Birchbox should focus more effort each month to ensure all customers receive a more balanced value for their money.  Each month I research the various boxes that are sent out to customers to see how even the distribution of products was.  I suggest Zadidoll's post on the August box, if you're curious to see the inconsistencies that upset me.

For me, Birchbox is entirely hit or miss.  About half the time I'm satisfied or elated with my boxes, and the other half I'm utterly disappointed and feel ripped off.  Last month I was really happy with my box.  The previous month not so much.  Because Birchbox has a great point system, I stay subscribed despite my numerous issues with their service.  I don't dislike Birchbox as a whole, I enjoy the concept and the product (most of the time).  I just feel like they should take it upon themselves to be more even and consistent in the boxes they send to subscribers each month.

Key Lime Marshmallows

I'm working on planning a Backyard S'more Party for early fall, and I've begun testing out new marshmallow recipes to make for some unique s'more combinations for my guests to create and enjoy.  One of the first flavor combinations that immediately came to mind when I began brainstorming for the party were Key Lime Pie S'mores (with homemade Key Lime Marshmallows and white chocolate on graham cracker).

Recently I did a little searching online for a key lime marshmallow recipe or a citrus marshmallow recipe I could convert to key lime.  I discovered this recipe for Lemon Lime Marshmallows and decided to adapt it to suit my needs.  Instead of using a mixture of lemon and lime juice, I substituted freshly squeezed key lime juice.

The resulting marshmallows were fluffy pillows of bright and tart key lime deliciousness!  These are definitely less sweet and more tart than your standard marshmallow, but I found them utterly refreshing and knew the tartness would be a perfect compliment for the super sweet white chocolate I would be paring these with for Key Lime Pie S'mores.

Paired with white chocolate, these were a perfect balance of sweet and tart and were wonderfully reminiscent of the classic pie.  If you're not feeling up to making s'mores, these marshmallows are also wonderful when dipped in white chocolate for a little added sweetness.

If you're a fan of tart key lime desserts, you should definitely give these a try.  With a few special tools (a candy thermometer and a stand mixer), marshmallows are really a breeze to make!


Key Lime Marshmallows
adapted from Mirabelle Creations
makes ~3 dozen marshmallows

1/4 cup powdered sugar
2 (1/4-ounce) envelopes unflavored gelatin
1/2 cup freshly squeezed key lime juice
1 3/4 cups sugar
3/4 cup light corn syrup
1/2 cup cool water
1/4 teaspoon salt
1 tablespoon grated key lime zest
green food coloring, optional

Spray a 9x9 dish with spray cooking oil and set aside. Sprinkle a small amount of powdered sugar in dish, covering bottom and sides. 

Combine the gelatin and key lime juice in the bowl of a stand mixer.  On the stove, over medium heat, add sugar, corn syrup, water, salt, and lime zest to a small pan. Stir until the sugar dissolves. Increase the heat to high.  Continue cooking the mixture, without stirring, until a candy thermometer inserted into the syrup reads 250 degrees F. This will take about 10-15 minutes and the mix will be boiling.

Mix the gelatin and key lime juice mixture on low speed.  After the syrup reaches 250 degrees, slowly pour it into the bowl of the electric mixer to combine with the gelatin. Mix on low speed until the syrup and gelatin mixture are combined.  Increase the speed of the mixer until it is on maximum. Beat the mixture until it becomes white in color and nearly triples in volume, about 15 minutes. Add the food coloring (to your desired color) to the mixture at this point and mix for one more minute.

Coat a rubber spatula with cooking spray.  Using the spatula, spread the marshmallow mixture into the prepared dish.  Lightly spray the cooking oil on your hand.  Press the marshmallow into the corners of the pan. Sprinkle with powdered sugar and allow the marshmallow to set, uncovered, overnight.

Using a knife, run the knife around the edges of the dish.  Turn the dish over and release the marshmallows from the dish onto wax paper, covered with powdered sugar. Using a knife, covered with powdered sugar, cut the marshmallows into 2 inch squares.  Roll the cut marshmallows in the powdered sugar, until all sides are covered.

Monday, August 6, 2012

Goose

Today I thought I'd share a few photos of our baby chinchilla, Goose.  I tried to get some photos of her earlier today but she wasn't cooperating too much.  She spent a few minutes pondering escaping her cage and then retreated to the back corner of the cage.  Hopefully she'll let me get some more photos of her soon.  I want to get plenty of pictures of her while she's still little (she's around two months old at the moment).

Check out the photos I took of Goose's big sister, Lucy, that I shared a couple month's back.

I just love my chin babies.
Related Posts Plugin for WordPress, Blogger...

Share Buttons