


 I had been using a loaner stove this past week as we waited for our range to arrive (there was a mix up initially and our builder's supplier brought the wrong range). This morning, bright and early, our door bell range and there was our shiny new range! We actually received a different refrigerator and dishwasher than we picked out/paid for, but they were upgrades from what we had chosen (our fridge is absolutely amazing, but that's a different post). The range we received today was also a free upgrade from the one I picked out. My new range has 5 burners and a convection oven with 6.0 glorious cubic feet of space and 4 oven racks, just waiting for me to bake a ton of delicious treats! I couldn't be more excited about my new kitchen!
 I'm growing to absolutely adore the color scheme of my kitchen. When I was dreaming of my future home, my head was full of pictures of white cabinets, butcher block counters and sweet candy colors. Now that I'm in my neutral-colored space, I'm really starting to love it. I'm planning on working in lots of white ceramic accents (such as the egg crate and creamer in the vignette) and throwing in a few punches of complimenting color. I really like the way the coral pink of the macarons in the print pop with the copper cookie cutter. I think these pinks add just enough color while still complimenting the neutral palette. Eventually I'd like to do a huge wall of photos in my kitchen behind where our table will go. I'm thinking lots of baking-related photos, mostly in muted neutral tones and maybe a few hints of color thrown in for interest. I really look forward to growing into the space and breaking it in with dinner parties and gatherings. I really feel at home here.
 After seeing John and Sherry at Young House Love add these adorable wallflowers by Umbra to their guest bedroom, I was completely smitten and knew I wanted to find a place to add them to my home one day. I'd love to add these white flowers to the right wall of my entry, sprinkled in sort of a random horizontal pattern, leading into the living room. I love the clean, graphic look of the flowers and their playful, whimsical feel. I think they would be the perfect thing to add a "wow" factor to our narrow entry.
 Originally I was hoping to find a place for a cute console table to use as a drop for keys, mail, etc. Since there isn't an ideal space for one in our future home, I was sort of lost for ideas. That is until I saw this cute and functional letter organizer, also from Umbra. I love the simple, sleek look of the brushed aluminum organizer. There is plenty of room to hold mail, a flap to hold notes, shopping lists, etc., and even a few hooks for keys. How perfect! I think there should be just enough room on the left wall of our entry, before the door to my studio/office and the coat closet, for this darling organizer.
 I stumbled upon this bedroom today and immediately fell in love! I've seen several bedrooms in the past that utilized crisp, clean whites and neutrals and have always enjoyed the sophisticated look and calming effect. This is by far the most lovely example I've seen and I would love to use this as inspiration for the day the hubby and I can invest in furniture and really decorate our bedroom. There is an elegance and grace about this room that really captivates me. It certainly has a feminine touch without being overwhelmingly girly. I think I could get my hubby on board for a knock-off version of this room for our future.
 I do love color, but I find I have difficulty finding color schemes I could really commit to. While some folks can afford to change out furniture or mix things up every few years, I just don't see that kind of luxury in my immediate future. With a neutral backdrop such as this, you could easily switch out relatively inexpensive accessories such as pillows and art to completely change the way the entire room looks. A room full of crisp, clean colors will always look elegant, sophisticated and luxurious.
 Photo of Young House Love's John and Sherry's gorgeous living room!
 I love the whimsy and vintage vibe of this workspace of Liz of say YES! to hoboken.
 I am crazy about this Before & After over at Design*Sponge today. The makeover was submitted by Joëlle from Umbu Lumière and I think it's fabulous! Something about the finished chair screams preppy to me, which isn't my usual style, but I am absolutely drawn to it. I really love how Joëlle left the two middle pieces on the back of the chair unpainted, while giving the rest a crisp, clean coat of white paint. And that plaid fabric on the seat? Repurposed from an old shirt. How fantastic is that?! This amazing before & after is going to be stuck in my head for quite some time.
 {click photos for link to original sources}
 I particularly love the pairing of crisp, white legs with a stained wooden top. I love the way a farmhouse table can look so rustic while being effortlessly feminized with a beautiful doily table runner or a vase of flowers.
 To say it simply, I just love their character. I've been dreaming of making one of these beautiful tables my own. I was standing in my kitchen today, arranging vintage china on pink open shelves and I was imagining how perfect a farmhouse table would accent my space. Though I often long for modern conveniences (oh, to own a dishwasher!), sometimes I really love the character of my kitchen. There's a 1940's farmhouse drainboard sink and a mishmash of furniture to add storage and workspace to otherwise open space. There are interesting architectural details and quaint little windows. It can be really charming when I look past the ugly floor, stained walls, and noisy pipes. I really think that a farmhouse table would be just the thing to add cohesion and create the illusion that all the little quirks were intentional.


 I really love Nicole uses interesting knick-knacks and display pieces to organize and show off her jewelry.
 All of her clothes and shoes are neatly and attractively displayed. While very full, the wardrobe is neat and everything is visible and easy to find. I love this inspiration for those who don't have a typical built-in closet to work with. See more photos and read more about Nicole's wardrobe here.
 Clothes are neatly hung on the bar to the left, a simple bookcase is brought in to organize and display a gorgeous shoe collection, and a shelf above the bar helps to utilize height for storing purses and other items.
 I am crazy about the beautiful display of jewelry and accessories and that fabulous little mirror! Freckles Chick added style and organization to her small closet for under $100. I really admire the way she was able to transform her lackluster closet into a really chic, practical space. This is a very attainable inspiration for those of us who don't have hundreds of dollars to spend on fancy closet systems. See more photos and read more about the makeover here.
 I love the separation and definiion of space. This space really feels like a trendy little boutique!
 I am crazy about the bright light streaming through the window. The room is so sunny and inspiring. I would love to get dressed every morning in this space! I adore the use of dressers in this closet space and the table in the middle of the room is beautiful and incredibly practical for folding and putting away clean laundry. I really love when form and function meet. Click here to see more of Kasey's fabulous closet.
 These systems offer a really sophisticated way to organize one's wardrobe. Different finishes are available, but I am most fond of this beautiful walnut finish. It looks so rich and luxurious.
 I think having a closet this beautiful would be all the inspiration I would need to stay on top of laundry and keep everything pressed and perfect. I could spend all day in such a beautiful space.
 I am really drawn to how decluttered these closets look. I like that they aren't filled to the brim. Each and every item of clothing looks expensive and fabulous. With room to breath, these clothes look crisp and clean. With everything in a similar palette, it would be easy to imagine countless different ways to pair outfits together.
 In hunting for more great handmade gift ideas, I happened upon a pattern inspired by this amazing vintage clothespin holder. The project comes from Hannah of Made With Love By Hannah and is so unbelievably adorable I squealed! I mean, seriously, how cute is that clothespin holder? I don't think I've happened upon anything this quite darling for some time.
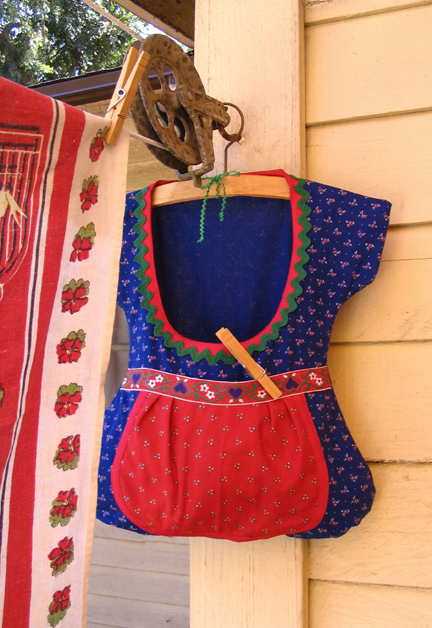 Here is the clothespin holder that Hannah created from her original vintage treasure. I love her choice of folkish fabrics. Perhaps I'll find something around my studio that could be stored in one of these adorable holders...
 I love the look of these sweet little mason jar sewing kits from Martha Stewart Living. I could sing the praises of the usefulness of mason jars all day long. Not only are these little mason jar sewing kits adorable, they are extremely practical. I have caught the sewing bug lately, inspired by my favorite crafter, and I could certainly use a few of these jars around my studio to house my small but growing collection of threads. I have a stray mason jar around from some hot cocoa mix I made last Christmas and I can't wait to make one of these! If you are interested in making your own, Martha offers some instructions and there is a great tutorial by Creative Ramblings with some very helpful step-by-step photos.
 I have been wanting to make Cookies & Cream Fudge for several months now and I finally made some yesterday evening. This fudge is perfect! It isn't painfully sweet like a lot of fudge I have tried and it has a nice firm, but soft texture. It's the perfect fudge, in my opinion. If you are a fan of cookies 'n' cream flavors, or like white chocolate and/or Oreo cookies, you will go crazy over this fudge.
 And what makes the fudge even better is the fact that it is laughably easy to make and only requires a few ingredients. I am always drawn to the sinfully thick slices of fudge you find at fudge shops, but I am turned off by spending $5 or more for a single slice of fudge when you can easily make a huge batch for less. Seriously folks, you have got to try this recipe. I poured mine into an 8x4'' loaf pan which yielded deliciously tall slices, just like your favorite fudge shop. Here I have cut each slice into three pieces for a more manageable bite. I served these up to the hubby and some of his friends and they were quickly devoured!
 I have loved the look of the these floating bookshelves since I first discovered them at the Curiosity Shoppe almost three years ago. These genius little gems are designed by Ezra Waltermaurer of Little Fish Furniture. Their quirky design are perfect little conversation pieces and make the ideal shelf to display any of your favorite flowers or knick-knacks. I just love them!
 click images for source
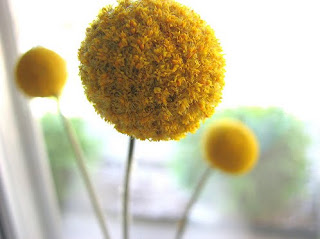
 I love the effortless beauty of a few billy buttons in simple white vases. The ever popular, totally affordable FÄRM vases from IKEA are perfect for this application.
 I have several of the IKEA vases and am dying to get some dried billy buttons to fill them with.
 click images for source
 I am dying to take on the project of creating a few little terrariums for my apartment. I love the fact that you can use almost any glass container to create a unique, one of a kind accent for your home. Craftzine has a great tutorial for how to create a mason jar terrarium. There is also a fantastic video on Design*Sponge by the folks at Sprout Home which shows how to build and care for a terrarium. I'd love to create a few in sweet little mason jars as well as some in more elaborate apothecary jars. I love how to can make them look wonderfully serene or totally kitsch by adding a few little plastic gnomes and deer. There are so many great tutorials and tons of inspiration online for those who are interested in creating their own terrariums. And for those who like a less hands-on approach, this Etsy seller has some fantastic terrarium creations for sale.
 Another little project I'd like try is growing paperwhites. From the tutorials I've seen, like this great one from John & Sherry at Young House Love, they are incredibly simple to grow! You can grow these gorgeous flowers in anything from water to rocks to potting soil. And even more fabulous is that they thrive indoors in the winter. I will definitely be testing out my green thumb on these beauties soon.
 As I mentioned in my last post, I did some yard sale shopping this past weekend with my mom and hubby. Fortunately the hubby and I were able to find a great set of matching bedside tables for only $5 each! We have been desperately needing bedside tables since we moved into our apartment last October. Now that we finally have them our bedroom looks a bit more polished. Aside from the much needed tables, I have to say that my favorite find of the day was a Waring Frozen Dessert Maker which I scored for a mere $2! I have been wanting an ice cream maker for some time and was seriously considering begging for one for my upcoming birthday. I was beyond excited when I found the Waring model in great condition.
 Strawberry Kiwi Sorbet
 This is what my dough looked like right after I mixed it all up in my Kitchenaid and dumped it into the container.
 And a side view.
 Here it is again, two hours of rising later.
 I will be shaping and baking the first loaf later. Pictures to come!
 I also decided to make a big pot of homemade chicken stock using the carcass from a chicken I roasted on Sunday. I can't wait to see how it turns out and to use it in some soup later.
 I will be posting "After" pictures of the bread and the stock later!
 As part of a little surprise welcome home dinner for the hubby, I baked some Snickerdoodle Cupcakes. They were very simple and unbelievably yummy! My husband is pretty picky about what he eats and he isn't very vocal about what he really likes. I know I have found a keeper when I see him go back for more and more and more... That is exactly what happened with these cupcakes.
 I was so pleased with how these turned out! They baked up so beautifully with perfect little dome tops. Unfortunately the liners turned a bit translucent once the cupcakes were baked. Half the liners had a sweet pink plaid design on white, the other featured a pink and brown floral print on white.
 Iced and decorated. Some got pretty pink sugar flowers, other received demerara sugar sprinkles. This recipe is definitely one of my favorites I've tried. The cinnamon cream cheese icing was divine, sweet but not too sweet. The overall Snickerdoodle flavor was perfect, a great change from the usual vanilla cupcakes with vanilla buttercream I typically do. Next time I need a treat for a crowd I will be making these again.

